
Fate-Mapping Technique: Using Carbocyanine Dyes for Vital Labeling of Cells in Gastrula-Stage Mouse Embryos Cultured In Vitro
- Children’s Medical Research Institute, University of Sydney, Wentworthville, New South Wales 2145, Australia
- ↵1Corresponding author (ptam{at}cmri.usyd.edu.au)
INTRODUCTION
The allocation of different progenitor populations to embryonic structures can be visualized by tracking the distribution of cells to specific tissues in the live embryo. A critical prerequisite for cell tracking is to identify unambiguously the progenitors and their descendants during morphogenesis. This can be achieved by using molecular markers that are expressed from transgenes integrated into the genome or as episomal DNA constructs, or by tagging the cells with exogenous markers that are incorporated into the cell membrane or cytoplasmic components of the cells. These labels can be introduced by dye-labeling the membrane, injecting marker enzyme into the cytoplasm, or integrating reporter constructs by transfection or electroporation. This protocol describes how to label cells in the endoderm (which, at this stage of development, is the superficial tissue layer) of live mouse embryos at 7.0-7.5 days post-coitum (dpc), using two carbocyanine dyes (DiI and DiO).
RELATED INFORMATION
As tools for tracking cell movement, fluorescent lipophilic dyes are ideal short-term, user-friendly cell markers. The carbocyanine tracers DiI (1,1′-dioctadecyl-3,3,3′,3′-tetramethylindocarbocyanine perchlorate, which emits a red fluorescence) and the analogous DiO (3,3′-dioctadecyloxacarbocyanine perchlorate, which emits a green fluorescence) are vital markers, i.e., they can be used on living cells. DiI is the most commonly used dye in fate-mapping studies because it retains fluorescence after fixation and wax embedding. DiI has been used in conjunction with carboxyfluorescein diacetate succinimidyl ester (CSFE) to intensify the fluorescent signal in living embryos, though in most cases this may be unnecessary. DiO, on the other hand, does not retain fluorescence following fixation or embedding.
These dyes can be applied focally to a small group of 10-15 cells (the number varies with the size of the apical surface of the cells if labeling is performed on cells in an epithelium), and broadly to cells over a large area of the embryo where many or all of the cells are labeled. Following labeling, cells and their descendants are traced to reveal the pattern of their displacement in the intact embryo, which is cultured in vitro. Details of the techniques for culturing whole post-implantation mouse embryos can be found in Sturm and Tam (1993) and in Roller Culture of Post-implantation Embryos.
The technique outlined in this article has been used for mapping the movement of the definitive endoderm during gastrulation and morphogenesis of the embryonic gut (Tam et al. 2004, 2007). The technique can also be used for marking the endoderm of more advanced embryos at early organogenesis (Tremblay and Zaret 2005), and for germ layers located deeper in the embryo, such as the ectoderm and mesoderm, as long as they can be accessed by micromanipulation instruments for the delivery of the dye.
MATERIALS
Reagents
Embryos stage 7.0-7.5 dpc, collected from mice housed in a reversed-light-cycle room
By using a reversed-light schedule (i.e., dark period from 6 am to 6 pm), the timing of mating can be shifted by about half a day so that the labeling experiment can be performed on 7.0-dpc embryos at normal working hours.
Paraffin oil, heavy (BDH)
Unlike light paraffin oil, this does not need cleaning.
Dissection and labeling of mouse embryos is performed in PB1 medium.
Phosphate-buffered saline (PBS)
Rat serum, 100%
Prepare according to Preparation of Rat Serum. To optimize the embryotrophic properties of the rat serum, following exsanguination, promptly separate the serum from the blood cells before clotting occurs.
Equipment
Bunsen burner
Capillaries, thick-walled glass (outer diameter: 1.0 mm, inner diameter: ~0.60 mm; Leica Microsystems, 520-119)
Capillaries, thin-walled glass (outer diameter: 1.0 mm, inner diameter: 0.75 mm; Drummond, 900 021 61)
Chamber slides, four-well (Nalgene Nunc International)
Culture bottles, glass, thin-walled (15-mL capacity)
Digital camera, SPOT advanced (version 3.5.9.1)
Diamond cutter
Fluorescence stereomicroscope (Leica MZ FLIII) with GFP3 (425/60 nm) filter set for DiO (excitation 470/40 nm,), and G filter set (546/10 nm) for DiI
Forceps, fine and standard (Fine Science Tools or Aesculap)
Gas mixture (5% CO2, 5% O2, 90% N2)
Gas mixture (5% CO2, 20% O2, 75% N2; optional, see Step 23)
Gas regulator
Supplies and maintains a continuously replenished gas phase in the rotating culture bottle.
Incubator, water-jacketed (37ºC, 5% CO2 in air; Forma Scientific)
Microforge (Narishige Scientific Instrument Laboratory)
Micromanipulation apparatus (Leica Microsystems)
-
Base plate with fixture points to attach the manipulators/joysticks
-
Dissecting microscope with ergonomic-wedge attachment for eyepieces
-
Instrument holders (double instrument holder, Leica 11520143)
-
Instrument sleeves
-
Micromanipulators for right-hand (Leica 11520137) and left-hand operation (Leica 11520138)
Micrometer, ocular
Needles, alloy metal (or glass)
These needles are made by electrolytically sharpening orthodontic wire (Rocky Mountain Orthodontics) using a wire-polishing unit (Dental Corporation of America).
Petri dishes (60 mm)
Photo manipulation software
Pipette puller, horizontal type (e.g., model P-97, Sutter Instruments)
Pipette puller, vertical type (e.g., Kopf model 720; optional, see Step 1.ii)
Pipettes, Pasteur (9 in)
Roller culture apparatus (e.g., BTC Engineering)
Scissors, iridectomy (Fine Science Tools)
Scissors, standard (Aesculap)
Syringe injector, micrometer (IM-5A/5B; Narishige)
This is an oil-filled system used to apply suction and expulsion action to the embryo-holding pipette.
Syringe injector, de Fonbrune (Alcatel)
The de Fonbrune injector is an oil-filled system used to apply suction and expulsion actions to the labeling pipette.
METHOD
Setting Up the Experiment
-
1. Prepare the glass needles.
Glass needles can be made in either of two ways. Be sure that the glass needles are flexible yet rigid enough to be used for cutting tissue fragments.
-
i. Pull thick-walled glass capillaries on a horizontal pipette puller. Each needle should have a fused tip, a long shaft, and a short shoulder.
-
ii. (Alternative method) Over a small Bunsen flame melt a short segment of thick-walled glass capillary into a solid glass filament. Pull the fused filament on a vertical needle pipette puller.
The small Bunsen flame can be made by connecting the end of a 20-gauge syringe needle to a Bunsen burner.
-
-
2. Prepare the holding pipettes.
-
i. Manually pull thick-walled glass capillaries over a small Bunsen flame (see Step 1.ii.).
-
ii. Using a diamond cutter cut the capillary at the thinnest point to make two pipettes.
-
iii. Turn on the current to the microforge filament.
-
iv. Push the end of a glass capillary onto the hot filament until a molten bead of the desired size is on the filament. To make the bead into a round shape, increase the heat by turning the current up to thoroughly melt the glass.
-
v. Polish the tip of each pipette by bringing the tip close to (but without touching) the molten glass bead on the microforge filament. Monitor the melting of the pipette tip until a polished tip with a small (<25 μm) inner diameter is formed.
The microforge polishes the tip and reduces the inner diameter of the holding pipette because the heated glass bead melts the tip of the holding pipette producing a smooth surface. It is against this smooth tip that the embryo is held when suction is applied (see Step 13).
-
-
3. Prepare the labeling pipettes.
-
i. Pull thin-walled glass capillary tubing on a horizontal pipette puller to produce pipettes with a fine tip, long shaft, and a short shoulder.
-
ii. With an ocular micrometer, choose the position along the shaft where a desired inner diameter (~10 μm is appropriate for labeling small groups of cells) will be produced if the capillary is broken at this point.
-
iii. Touch the intended break point of the pipette to a molten glass bead on the heated microforge filament.
-
iv. When the bead and the capillary begin to fuse, turn off the power supply to the microforge filament. The capillary will snap at the point where it fuses with the glass bead as the microforge filament retracts on cooling.
-
-
4. Bend the pipettes.
Before use, both the labeling and holding pipettes are shaped by introducing two bends in their shafts.
-
i. In a small flame, heat the pipette at a point 1-2 cm from the tip until it is bent to an angle of ~90°-100°.
-
ii. Turn the pipette (tip pointing upward) and heat it at a position 1-2 cm from the first bend until the pipette is again bent at ~90°-100° in the opposite direction to the first bend. These two bends will allow the pipette to reach over the lip of the Petri dish to access the embryos in the dish (Fig. 1).
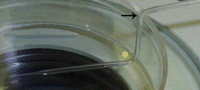 Figure 1.
Labeling pipette. Two bends are generated in both the holding and the labeling pipette to ensure that the pipette can reach over the lip of the Petri dish to access the embryo. Using a small flame, the first bend (asterisk) is introduced 1-2 cm from the tip. Turn the pipette (tip pointing upward) and generate the second bend (arrow) 1-2 cm from the first bend. The angle of each bend is ~90°-100°.
-
-
5. Harvest embryos into 100% rat serum in a four-well chamber slide. Place the chamber slide in a 37°C CO2 incubator.
The four-well chamber slide containing rat serum is equilibrated in an upright CO2 incubator at 37° prior to dissection of the mouse. After dissection, the embryos should be kept in the chamber slides in the incubator before labeling. It is best to start the experiment as soon as possible after collection.
-
6. Set up the micromanipulation dish for labeling.
-
i. Place a 5 μL drop of PB1 medium on the lid of an upturned 60-mm Petri dish. Place the drop a bit off center.
-
ii. Place a 1-2 μL drop of dye next to the medium drop and then flood the dish with light paraffin oil.
-
iii. Place the dish on the stage of the micromanipulator.
-
-
7. Set up the micromanipulators (see Fig. 2).
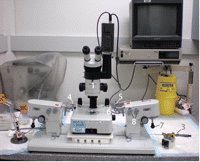 Figure 2.
Micromanipulation setup. (1) Wild M3Z (Leica) dissecting microscope. (2) Oil-pump syringe (DeFonbrune) for operating labeling pipette. (3) Microinjector (Nashirige) oil-filled micrometer syringe for operating the holding pipette. (4) Instrument holder for holding pipette. (5) Instrument holder for labeling pipette. (6) Instrument sleeve for labeling pipette. (7) Joystick for fine positioning of the instrument holder in the horizontal plane. (8) Coarse adjustment knobs for positioning the right micromanipulator.
-
i. Confirm that the chamber of the syringe, the connecting tubing and the instrument sleeves are fully filled with heavy paraffin oil. The presence of air bubbles in the system makes it difficult to control the fluid pressure and the volume of displacement.
-
ii. Insert the holding and labeling pipettes into the instrument sleeves.
-
iii. Mount the holding pipette onto the instrument holder on the left manipulator and connect it to the micrometer syringe on the right. Mount the labeling pipette onto the instrument holder on the right manipulator and connect it to the de Fonbrune syringe on the left of the manipulation apparatus. This enables both hands to be used in a natural position to control the movement of the manipulator and to adjust the fluid pressure in the injection device.
-
iv. Backfill the holding and labeling pipettes with heavy paraffin oil by adjusting the micrometer syringe and the de Fonbrune syringe.
-
v. Position the micromanipulators so that the tip of the holding and labeling pipettes are in the center of the dish when the joystick of the micromanipulator is in the vertical position.
-
-
8. Transfer three or four embryos from the incubator to the PB1 medium drop (Step 6) using a Pasteur pipette.
-
9. Realign the microinjection pipettes so that the embryos and instruments are all in the same focal plane (Fig. 3A).
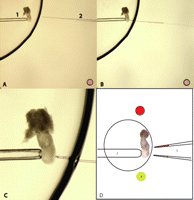 Figure 3.
(A) The operating medium drop/PB1 for labeling. The embryo is kept stationary with the holding pipette (1). With the holding pipette the embryo is moved to the edge of the PB1 such that the labeling site is nearest to the medium-oil interface. The labeling pipette (2) is loaded with dye and kept in the oil phase near the medium drop. The labeling pipette and site of labeling is aligned to ensure they are in same focal plane. (B) Move the labeling pipette slowly into the medium drop to ensure that the dye is not leaking from the pipette. (C) When the labeling pipette touches the site of labeling on the embryo carefully expel the dye in the labeling pipette. When an adequate amount of dye has been released onto the embryos, stop further painting by lowering the oil pressure in the labeling pipette and quickly remove the pipette from the medium drop. (D) Successive labeling using double-instrument holder. (1) 7.5-dpc embryo to be labeled. (2) Holding pipette. (3) and (4) Separate droplets of DiI and DiO. (5) Two labeling pipettes filled with either DiI or DiO and mounted on a double-instrument holder which allows for successive deployment of the two pipettes for labeling.
-
10. Using an alloy metal or glass needle, position an embryo so that the area to be labeled aligns with the tip of the labeling pipette.
-
11. Adjust the position of the holding pipette so that its tip just touches the embryo. Apply suction through the micrometer syringe to hold the embryo by drawing a small area of the yolk sac membrane into the pipette. Move the pipette gently back and forth once to ensure that the embryo is held tightly.
Labeling the Embryos with a Single Dye
-
12. Move the labeling pipette into the dye drop and slowly reduce the expulsion pressure by adjusting the de Fonbrune syringe so that a small volume (~0.2 μL) of the dye is drawn into the pipette. Load only enough dye for a single labeling to minimize the chance of excessive labeling. Keep the tip of the loaded labeling pipette in the paraffin oil near the medium-oil interface.
Keeping the pipette tip in the paraffin oil (and out of the PB1 medium) will stop dye from leaking out of the pipette.
-
13. Move the holding pipette to bring the embryo to the edge of the PB1 medium drop such that the labeling site is nearest to the medium-oil interface (Fig. 3A).
-
14. Align the labeling pipette with the labeling site such that they are in the same focal plane (Fig. 3B). Advance the labeling pipette toward the embryo.
Moving the labeling pipette from the light paraffin oil into the medium drop may cause some dye to leak from the pipette due to changes in fluid viscosity. This can be prevented by using the de Fonbrune syringe to slightly decrease the pressure as the labeling pipette moves into the PB1 medium.
-
15. Once the labeling pipette touches the embryo, slowly expel the dye by raising the oil pressure in the pipette (by adjusting the de Fonbrune syringe) while maintaining contact with the embryo (Fig. 3C). Monitor the progress of labeling by noting the movement of the oil-dye interface in the labeling pipette. When enough dye has been expelled, decrease the oil pressure by adjusting the syringe and retract the labeling pipette quickly into the oil phase.
For labeling a small area, keep the pipette tip touching the tissue, expel a small bolus of dye, then retract the labeling pipette quickly. For labeling larger areas, a larger volume of dye should be drawn into the labeling pipette (Step 12), which will be expelled continuously during labeling.
-
16. Release the embryo from the holding pipette. Use a Pasteur pipette to transfer the labeled embryo to the four-well chamber slide containing 100% rat serum. Return the chamber slide to the CO2 incubator.
-
17. Repeat Steps 12-16 until all the embryos in the medium drop have been labeled.
Double-Labeling the Embryos
Embryos can be labeled with two dyes either sequentially (Step 18) or simultaneously (Step 19).
-
18. Double-label the embryos one dye at a time.
-
i. Prepare two micromanipulation dishes each with a different dye as described in Step 6.
-
ii. Set up the micromanipulator as described in Step 7.
-
iii. Perform Steps 8-17.
-
iv. Transfer all of the singly-labeled embryos to the medium drop of the other dish containing the second dye.
-
v. Repeat Steps 9-17 using a fresh labeling pipette.
-
-
19. Double-label each embryo with two dyes before labeling the next embryo (Fig. 3D).
-
i. Prepare a micromanipulation dish as described in Step 6 but with two dye drops.
-
ii. Set up the micromanipulator as described in Step 7, except that two labeling pipettes are mounted on a double-instrument holder on the micromanipulator (see Fig. 2).
-
iii. Perform Steps 8-11.
-
iv. Perform Step 12 but load each labeling pipette with a different dye.
-
v. Complete Steps 13-15 for the first dye and repeat for the second dye, then transfer the labeled embryo to the culture chamber slide (Step 16).
-
vi. Repeat the loading and double labeling procedure until all the embryos have been labeled.
-
Imaging and Culturing Embryos
-
20. After all of the embryos have been labeled (singly or doubly), image the labeled cells/whole embryos. This should be done within 1-3 h after commencing the labeling experiment, so that a record of the initial pattern of labeling is recorded before the labeled cells are displaced away from their original location.
-
21. Transfer the embryos to 100% rat serum in a rotating culture system with 5% CO2, 5% O2, and 90% N2 at 37°C (Fig. 4).
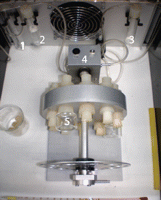 Figure 4.
Rotating bottle culture apparatus. The rotator is housed in a thick persplex temperature-controlled chamber. Gas is fed through (1) a porous particle filter, (2) a humidifier, and (3) an overflow trap to an inlet that goes to the inner chamber of (4) the rotating drum to which (5) culture bottles with medium containing the embryos are attached.
-
22. Embryos can be imaged repeatedly at any desired intervals during the 24-48 h of in vitro culture.
-
23. (Optional) If the 7.0- to 7.5-dpc embryos are cultured for a total of 48 h, then the media and gas requirements change after the first 24 h. Embryos at stage 8.0-8.5 dpc are cultured in DR75 and 5% CO2, 20% O2, and 75% N2 (see Roller Culture of Post-implantation Embryos).
Analyzing the Labeled Embryos
At 24 and/or 48 h after culture, analyze the embryos by photographing the distribution of labeled cells under a fluorescence stereomicroscope with the appropriate filter sets for DiO and DiI.
-
24. Transfer embryos from the roller culture to a Petri dish containing PB1 medium that has been prewarmed in an upright CO2 incubator at 37°C.
-
25. To record the distribution of labeled cells, capture three separate images using the SPOT advanced digital camera attached to the fluorescence stereomicroscope system.
-
i. Position the embryos so that the labeled side is facing the camera.
-
ii. Capture the first image using the bright-field setting.
-
iii. Keep the embryo in the same position and capture a second image (and a third image if embryos are double-labeled) using the GFP and/or rhodamine filters.
-
iv. Merge the images and edit them using photo manipulation software.
-
-
26. Rinse the embryos in PBS, fix them in 4% paraformaldehyde (see Fixation of Mouse Embryos and Tissues) and store them at 4°C.
The fluorescence of some dyes may begin to dissipate (e.g., DiO) after fixation. It is advisable to take all of the photographs as soon as possible.
-
27. Fixed embryos which are labeled with CM-DiI can be embedded and sectioned for more detailed analysis of cell distribution.
CM-DiI fluorescence is still detectable after histology preparation. In contrast, DiO does not survive histological processing and has to be visualized in cryosections of unfixed or briefly fixed embryos.
TROUBLESHOOTING
Problem: Lack of fluorescent cells in labeled embryo.
[Step 5]
Solution: Consider the following:
-
Occasionally the dye will remain as a “bubble” only slightly attached to the endoderm so cells are not labeled properly and the dye “bubble” will detach itself from the embryo during culturing.
-
Make sure that the dye is freshly made as it deteriorates with time. Check to see if the dye is seeping into the oil. If this is occurring make fresh dye immediately before the labeling procedure.
Problem: Fluorescence observed in the mesoderm of the embryo.
[Step 5]
Solution: Consider the following:
-
Perhaps the endoderm was ruptured by the injection needle allowing dye to adhere to the mesoderm. Be careful not to push too hard on the embryo.
-
During dissection of the embryos it is vital that the endoderm is not damaged. Damage that exposes the underlying mesoderm could lead to its subsequent labeling.
Problem: Abnormal development of an embryo.
[Step 6]
Solution: Consider the following:
-
The gas in the incubator must be supplied at a constant flow and the temperature of the incubator must be maintained at 36°C-37°C.
-
The quality or heat inactivation of the rat serum is suspect. After collection of the whole blood, immediately centrifuge the serum; then perform a visual check to ensure that the sample is a clear straw-colored fluid, free of any sign of hemolysis (i.e. red tint of the serum) or cloudiness (due to high lipid content).
-
It is important to keep to a minimum the time the embryos spend outside of the incubator during manipulation and labeling, because prolonged holding at room temperature may reduce viability of the embryo.
DISCUSSION
Dye-labeling is a technique that has been used extensively to study morphogenetic processes associated with cell and tissue movement. This technique has been used in zebrafish (Mangrum et al. 2002), Xenopus (Chalmers and Slack 2000), chick (Hatada and Stern 1994), and mouse (Tam et al. 2007) to track the allocation of the germ layers, the migration of cell populations such as neural crest cells (Collazo et al. 1993; Trainor et al. 1994), and the development of neuronal projections within the nervous system (Baker and Reese 1993).
In mutant embryos, dye-labeling is used to track movement and tissue contribution of the mutant cells thereby revealing the effect of particular mutations and pinpointing the cell population most affected (Tam et al. 2007). Fluorescent dyes are available in a variety of colors, which permits multiple labeling of different cell populations so that their movement relative to each other can be analyzed.
Dye-labeling allows control over the amount of dye delivered and the size of the area to be labeled. Blanket labeling gives a global view of the movement of a cell population, while more focal labels can reveal movement of individual groups of cells (Fig. 5). In contrast to cell grafting (see Fate-Mapping Technique: Grafting Fluorescent Cells into Gastrula-Stage Mouse Embryos at 7-7.5 Days Post-coitum) (Franklin et al. 2007) or electroporation of a reporter construct (see Fate-Mapping Technique: Targeted Whole-Embryo Electroporation of DNA Constructs into the Germ Layers of Mouse Embryos 7-7.5 Days Post-coitum) (Khoo et al. 2007), dye-labeling requires the least preparation of the labeling reagent or transgenic resources and allows an instantaneous evaluation of incorporation of the dyes by fluorescence microscopy at the beginning of the experiment. One disadvantage of dye-labeling is the dilution of the cell marker with every cell division. The longevity of the cell marker may become a significant problem when embryos are cultured for more than 48 h.
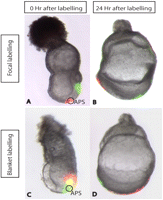
Focal and blanket double labeling of 7.0-dpc embryos. (A) 7.0-dpc embryo labeled focally with DiI at the anterior part of the primitive streak (APS, circle) and with DiO at the posterior part of the primitive streak. (B) Twenty-four hours later, labeled cells are distributed along the midline, with DiI-labeled cells allocated at the anterior part of the embryo, which will make up the future head region. DiO-labeled cells are predominantly found in the midgut and hindgut region of the 8.0-dpc embryo. (C) 7.0-dpc embryo labeled broadly with DiI and DiO resulting in separate and overlapping regions of labeling. (D) Twenty-four hours later, cells are distributed along the midline with DiO-labeled cells originating from the APS localized in the head region, whereas the DiI-labeled cells are found in the posterior part of the foregut and extensively in the midgut and hindgut regions.
We have successfully used this protocol to track the movement of cells in the endoderm layer during gastrulation in wild-type and mutant embryos. Single- and double-labeling of the endoderm in the wild-type embryo has enabled us to chart the timing and pattern of migration of endoderm cells (Tam et al. 2007). From these studies we have constructed a fate map that depicts the assembly of the embryonic gut in the mouse. Tracing the movement of the endodermal cells in mutant embryos has revealed the abnormality of cell movement in the endoderm, which may underpin the mutant phenotype.
This protocol can also be used for labeling endoderm of 8.0-dpc embryos. This technique is also generally applicable for labeling all germ layer derivatives provided that the tissues are accessible for micromanipulation.


