
Purification of Oligodendrocyte Precursor Cells from Rat Cortices by Immunopanning
- 1Myelin Repair Foundation, Saratoga, California 95070;
- 2Department of Neurobiology, School of Medicine, Stanford University, Stanford, California 94305-5125;
- 3Department of Anatomy and Neuroscience and the Florey Institute of Neuroscience and Mental Health, University of Melbourne, Melbourne, Victoria 3010, Australia
Abstract
This protocol describes how to purify oligodendrocyte precursor cells (OPCs) from postnatal rodent brains. The method utilizes an immunopanning technique to first remove unwanted cells by negative selection and then purify OPCs by positive selection and subsequent enzymatic release from the final panning plate. Included are modifications that allow for purification and culturing of OPCs from mouse instead of rat tissue and for use of optic nerves instead of whole brains. The method for isolating OPCs from whole brain can be used for isolating OPCs from any specific region of the brain, provided that the area can be dissected away from the rest of the tissue. Suggested culture media for maintaining proliferating OPCs or inducing oligodendrocyte (OL) differentiation are also described.
MATERIALS
Reagents
Antibodies
-
Anti-mouse Thy 1.2 monoclonal (Serotec MCA02R) (for mouse OPCs only)
-
Anti-O1 antibody (Millipore MAB344)
-
Anti-O4 antibody (Millipore MAB345)
-
Goat anti-mouse IgG + IgM (Jackson ImmunoResearch 115-005-044)
-
Goat anti-mouse IgM, µ chain specific (Jackson ImmunoResearch 115-005-020)
BSA (4%)
-
To prepare a stock of 4% BSA in Dulbecco’s phosphate-buffered saline (D-PBS), dissolve 8 g of BSA (Sigma-Aldrich A4161) in 150 mL of D-PBS (HyClone SH30264.01) at 37°C. Adjust the pH to 7.4 with ∼1 mL of 1 n NaOH. Bring the volume to 200 mL. Filter through a 0.22-μm filter. Store in 1-mL aliquots at −20°C.
DNase I
-
On ice, dissolve 12,500 U of DNase I (Worthington Biochemical LS002007) per 1 mL of chilled Earle’s Balanced Salt Solution (EBSS; Invitrogen 14155-063). Filter-sterilize on ice. Aliquot (e.g., 200 µL/tube) and freeze overnight at −20°C. Store aliquots at −20 to −30°C.
Dulbecco’s phosphate-buffered saline (D-PBS) with phenol red
-
Add 500 µL of 0.5% phenol red (Sigma-Aldrich P0290) per 500 mL bottle of Dulbecco’s phosphate-buffered saline (D-PBS; Invitrogen 14287-080).
Dulbecco’s phosphate-buffered saline (D-PBS) without Ca2+/Mg2+ (Invitrogen 14190-144)
-
IMPORTANT: D-PBS without Ca2+/Mg2+ is ONLY used for tissue dissection (see Steps 9 and 15). All other steps in the protocol refer to the standard D-PBS with phenol red. Cells will not stick to the panning plates in the Ca2+/Mg2+-free D-PBS.
Earle’s balanced salt solution (EBSS) (Invitrogen 14155-063)
Ethanol (70%)
Ethanol-washed glass coverslips (optional)
Fetal calf serum (FCS) (heat-inactivated)
-
Prepare 50-mL aliquots of fetal calf serum (Invitrogen 16000-036) in sterile conical tubes. Heat-inactivate aliquots for 30 min in a 55°C water bath, and then store at −20°C.
High-ovomucoid (high-ovo) stock solution (6×)
L-cysteine (Sigma-Aldrich C7477)
Low-ovomucoid (low-ovo) stock solution (10×)
NaOH (1 m, sterile)
-
Addition of PDGF and NT-3 to medium in the absence of T3 will promote OPC proliferation, whereas addition of T3 to medium in the absence of PDGF and NT-3 will promote rapid OL differentiation. Robust differentiation will also commence in medium lacking both mitogens (PDGF and NT-3) and T3, but OLs might be slightly less healthy. For the study of OPCs in the complete absence of T3-mediated signaling, prepare DMEM-Sato base growth medium without B-27. We have found that FGF is not required in the medium to inhibit differentiation and maintain OPCs as immature, proliferating cells.
Papain (Worthington Biochemical LS003126)
Phenol red solution (0.5%) (Sigma-Aldrich P0290)
Phosphate-buffered saline (PBS) (filter- or autoclave-sterilized)
Poly-d-lysine (PDL) stock (1 mg/mL)
-
The 1 mg/mL solution is a 100× stock. Dilute it to 1× in sterile H2O before use.
Ran-2 hybridoma cells (supernatant for rat OPC prep) (ATCC TIB-119)
Rat pups (Sprague–Dawley) (postnatal day 6–8)
-
One rat brain should yield ∼2–3 × 10⁶ OPCs, whereas one mouse brain should yield ∼0.8–1 × 10⁶ OPCs. Yields and initial viability of purified OPCs will progressively decline in correlation with the age of animals used: Older animals yield lower numbers of less healthy OPCs. Mouse pups at postnatal day 6–8 can also be used.
Tris-HCl (50 mm, pH 9.5) (filter- or autoclave-sterilized)
Trypsin stock
-
Dissolve trypsin (Sigma-Aldrich T9935) at 50,000 U/mL in Earle’s Balanced Salt Solution (EBSS) (Invitrogen 14155-063) on ice. If the powder does not go into solution easily, stir with a magnetic stir bar or try altering the pH with NaOH or HCl as appropriate. When fully dissolved, aliquot (e.g., 200 µL/tube) and store at −80°C. For each new batch of trypsin stock, the optimal trypsinization time required to release OPCs from the final panning plate (Step 46) should be redetermined.
Trypan blue (Invitrogen 15250-061)
Equipment
Centrifuge (tabletop, with 15-mL/50-mL conical tube adaptors)
Conical tubes (15- and 50-mL, sterile)
Dissection microscope
Forceps (#5 or #55) (for optic nerve preparation)
Glass spreader (sterile)
Heat block base (with a flat insert set to 34°C in a sterile hood)
Hemocytometer slide (Hausser Scientific 3110)
Laminar flow tissue culture hood
Monoject syringes (sterile) (Fisher Scientific)
Needles (21- and 23-gauge) (for optic nerve preparation)
Nitex mesh filters
-
Nitex mesh 20-μm opening filters can be ordered from Amazon. Cut filters into approximately 3 inch × 3 inch squares. Wrap sets of 8–12 in aluminum foil and autoclave to sterilize.
Petri dish lid (6-cm, with a hole in the center to accommodate a 0.22-μm filter)
-
Create the hole using flamed forceps to melt an opening into the center of the lid, or use a drill.
Petri dishes (6-, 10-, and 15-cm) (Falcon or Nunc)
Scalpel blade handle
Scalpel blades (#10)
Scissors (large, for decapitation) (e.g., Roboz RS-6820)
Scissors (small, curved) (e.g., Roboz RS-5675)
Scissors (very fine) (for optic nerve preparation) (e.g., Roboz RS-5602)
Source of carbon dioxide (5% CO2/95% O2) with a line leading to a heat block in a sterile hood
Syringe filters (0.22-μm)
Tissue-culture incubator (set to 37°C, 10% CO2)
Tissue-culture plates (plastic) (6- and 24-well) (Falcon or Nunc)
Water bath (set to 37°C)
METHOD
-
An overview of the method is provided in Figure 1. For any steps that require filter sterilization of reagents before use, prerinse the filter with 5–10 mL of base liquid (e.g., D-PBS) to remove any residual surfactants that may be detrimental to cell health. Discard the prefilter liquid before filtering the solution to be sterilized.

Immunopanning of OPCs. ON, optical nerves.
Preparation of Plates and Reagents
-
Perform Step 1 on the day before cell purification. Steps 2–5 can be performed the day before or the same day as cell purification. (PDL-coated coverslips and tissue culture plates are usable up to 6 d following preparation.) For users familiar with the protocol, Steps 2–5 also may be performed during the 90-min papain digestion (Step 17) or panning steps (Steps 35–39) to save time.
-
1. Coat the panning dishes with secondary antibodies as follows.
-
i. Coat two 15-cm Petri dishes with 60 µL of goat anti-mouse IgG + IgM plus 20 mL of sterile 50 mm Tris-HCl (pH 9.5) per dish.
-
ii. Coat one 10-cm Petri dish with 30 µL of goat anti-mouse IgM plus 10 mL of sterile 50 mm Tris-HCl (pH 9.5).
-
iii. Swirl the plates until the surfaces are evenly coated with the antibody-Tris solution.
-
iv. Incubate the panning plates overnight at 4°C.
-
One set of panning plates and reagents is sufficient for one postnatal rat brain, one to three postnatal mouse brains, or one to three litters of rodent optic nerves.
-
-
-
2. Prepare the culture dishes as follows.
-
i. Add 5 mL/1 mL/250 µL of 1× PDL per well to 10-cm/6-well/24-well tissue culture plates, respectively.
-
ii. Swirl to evenly coat plastic.
-
iii. Incubate for 20–60 min at room temperature.
-
iv. Rinse the plates three times with sterile H2O.
-
v. Allow the plates to completely air-dry before use.
-
-
3. Prepare the coverslips as follows.
-
i. Rinse the ethanol-washed glass coverslips three times with sterile H2O in a Petri dish.
-
ii. After the last rinse, suction away the remaining H2O and separate the coverslips in the plate such that they are not touching each other or the sides of the plate.
-
iii. Allow the coverslips to completely air-dry.
-
This should take 5–10 min after suctioning.
-
-
iv. Carefully add 100 µL of 1× PDL to the center of each coverslip.
-
The solution should remain as a bubble on the coverslip.
-
-
v. Incubate for 30–60 min at room temperature.
-
vi. Rinse the coverslips three times with sterile H2O.
-
vii. Transfer the coverslips to 24-well tissue culture plates, placing one coverslip per well.
-
viii. Suction any remaining H2O from the wells, being careful to keep the coverslips centered and not touching the sides of the wells.
-
If the coverslips contact the sides of the wells, the preplating of OPCs will not work.
-
-
ix. Allow the coverslips to completely air-dry before use.
-
-
4. Prepare 40 mL of 0.2% BSA solution by adding 2 mL of 4% BSA stock to 38 mL of D-PBS. Store at 4°C.
-
5. Prepare the DMEM-Sato base medium (or the desired medium) for the cells.
Preparation for Cell Purification
-
Perform Steps 6–10 on the day of cell purification. For users familiar with the protocol, Step 10 also may be performed during the 90-min papain digestion (Step 17) to save time.
-
Do not allow the plates to dry at any stage.
-
6. Coat the panning dishes with primary antibodies as follows.
-
i. Rinse each antibody-coated plate (prepared in Step 1) three times with PBS.
-
ii. To prepare for use of rat cells, coat one 15-cm plate from Step 1 with 4 mL of Ran-2 hybridoma supernatant plus 8 mL of 0.2% BSA (prepared in Step 4).
-
iii. To prepare for use of mouse cells, coat one 15-cm plate from Step 1 with 20 µL of Thy 1.2 antibody plus 12 mL of 0.2% BSA.
-
iv. Coat one 15-cm plate from Step 1 with 12 µL (12 µg) of O1 antibody plus 12 mL of 0.2% BSA.
-
v. Coat one 10-cm plate from Step 1 with 5 µL (5 µg) of O4 antibody plus 5 mL of 0.2% BSA.
-
vi. Swirl to evenly coat plastic.
-
vii. Incubate plates >2 h at room temperature.
-
-
7. Equilibrate 10 mL of papain buffer in a 6-mL Petri dish as follows.
-
i. Presterilize a 6-cm dish lid with a central hole by spraying with 70% EtOH. Let air-dry.
-
ii. Place the 6-cm dish containing papain buffer on a 34°C heat block in a sterile hood.
-
iii. Place a 0.22-μm filter at the end of a 5% CO2 / 95% O2 line and place the sterile end of the filter through the hole in the sterilized lid.
-
iv. Place the lid supplying gas over the papain buffer dish in the heat block and supply a gentle flow of gas.
-
-
8. Place 10 mL of EBSS containing 0.0005% phenol red into a 10% CO2 incubator to equilibrate.
-
9. Add ∼300 µL of D-PBS without Ca2+/Mg2+ to a 6-cm Petri dish. Alternatively, if OPCs will be isolated from optic nerves rather than whole brain, use ∼5 mL of D-PBS without Ca2+/Mg2+.
-
10. Prepare the solutions for dissociation, panning and trypsinization as follows.
-
i. Prepare low-ovo working solution by adding 1 mL of 10× low-ovo stock to 9 mL of D-PBS.
-
ii. Prepare high-ovo working solution by adding 1 mL of 6× high-ovo stock to 5 mL of D-PBS.
-
iii. Prepare panning buffer by combining 1.5 mL of 0.2% BSA solution, 13.5 mL of D-PBS, and 150 µL of insulin stock (500 µg/mL).
-
iv. Add 3 mL of heat-inactivated FCS to 7 mL of D-PBS and filter through a 0.22-μm filter to sterilize.
-
The phenol red color of the low- and high-ovo solutions should be orange (neutral pH) rather than red (too basic) or yellow (too acidic). If necessary, sterile 1m NaOH can be used to equilibrate both solutions back to neutral pH.
-
-
Dissection
-
See Movie 1 for an illustration of Steps 12–15.
-
11. Decapitate one Sprague–Dawley rat pup (or mouse pup) (P6-8) with sharp scissors.
-
12. Cut the skin along the top midline of the head, and peel back to reveal the skull.
-
13. Use curved scissors to open the skull: Insert the scissors at the opening at the back of the skull and cut along the left and right edge of the skull, above the ear to just above the eye socket.
-
14. Lift the skull bone to reveal the brain.
-
15. Dissect and harvest the brain or optic nerves as follows.
To Harvest the Brain-
i. Cut away the olfactory bulbs at the front of the brain, then remove the rest of the brain.
-
The specific brain region of interest can also be dissected at this stage.
-
-
ii. Place the tissue in 300 µL of D-PBS without Ca2+/Mg2+ in the dish prepared in Step 9.
-
iii. Dice the brain with a #10 scalpel into ∼1-mm3 chunks.
-
iv. After cutting the olfactory bulbs, lift the front of the brain up to reveal the optic nerves/optic tracts stretching from the base of the brain to the eye sockets. Cut the optic tracts immediately adjacent to the optic chiasm to leave the optic chiasm attached to the two optic nerves.
-
v. Cut at the base of each eyeball by inserting the curved scissors into the eye orbit behind the eyeball to detach the optic nerve from the eyeball.
-
vi. Grab the optic chiasm with tweezers and lift the optic chiasm plus the two optic nerves from the base of the skull.
-
vii. Place the tissue in the dish of 5 mL D-PBS without Ca2+/Mg2+ prepared in Step 9.
-
viii. Dice the nerves with very small dissection scissors. Discard the optic chiasms.
-
Optic nerves should be harvested from approximately 10 pups to obtain ∼500,000 OPCs.
-
-
Brain dissection. Illustrates Steps 12–15.
Tissue Dissociation
-
16. Prepare the papain solution.
-
i. Move the equilibrated papain buffer prepared in Step 7 to a 15-mL conical tube and add 200 units of papain.
-
ii. Place this papain solution in a 37°C water bath for 5–15 min to allow the papain to dissolve.
-
iii. Weigh out and add 2 mg of l-cysteine to the solution.
-
iv. When fully dissolved, filter the papain solution through a 0.22-μm filter to sterilize.
-
v. Add 200 µL of DNase I stock solution to the papain solution.
-
-
17. Digest the tissue as follows.
Brain-
i. Add the papain solution from Step 16 directly to the diced brain tissue in the 6-cm Petri dish.
-
ii. Place the dish of tissue in papain solution in an empty heat block at 34°C, and then cover with the same lid used to equilibrate the papain solution.
-
Brain dissociation digestions performed at 34°C slightly increase the health of the cells obtained compared to digestions at 37°C.
-
-
iii. Keep the tissue under 5% CO2/95% O2 gas flow at 34°C for 90 min, gently agitating the tissue every 15 min to ensure complete tissue digestion.
-
iv. Remove all of the D-PBS solution from the diced optic nerve tissue and add the papain solution.
-
v. Transfer the diced tissue to a sterile 50-mL conical tube and digest for 90 min in a 34–37°C water bath, gently agitating the tissue every 15 min.
-
-
18. Just before the digestion step is complete, add 100 µL of DNase I stock solution to the low-ovo working solution prepared in Step 10.
-
19. When the digestion is complete, transfer the tissue in papain solution to a sterile 15-mL conical tube and allow the tissue pieces to settle.
-
20. Carefully remove as much papain solution as possible from the tissue.
-
21. Gently add 2 mL of low-ovo solution with DNase I from Step 18 to the tissue to stop papain digestion. Allow the tissue to settle once again.
-
22. Remove and discard the low-ovo solution from the tissue.
-
23. Add 2 mL of fresh low-ovo solution with DNase I to the tissue.
-
Dissociation is performed in low-ovo solution because the cells survive trituration better in a lower protein solution. High-ovo is subsequently used to fully quench any residual papain enzymatic activity.
-
-
24. Dissociate the tissue as follows.
Brain-
See Movie 2 for an illustration of Steps 24.i–24.v.
-
i. Gently pipette the tissue six to eight times through a 5-mL pipette.
-
ii. Let the tissue chunks settle for 1–2 min.
-
iii. Remove 1–1.5 mL of the resulting cell suspension, trying to avoid large tissue chunks. Place the collected cell suspension in a new, sterile 15-mL conical tube.
-
iv. Add 1 mL of low-ovo solution with DNase I and repeat Steps 24.i–24.iii.
-
v. Add 1 mL of low-ovo solution with DNase I, then follow Steps 24.i–24.iv, now triturating tissue through a 1-mL pipette tip; repeat until all of the tissue is dissociated and the low-ovo solution prepared in Step 18 is used up.
-
vi. Pipette the tissue six to eight times through a 1-mL pipette tip.
-
vii. Let the tissue chunks settle for 1–2 min.
-
viii. Remove 1–1.5 mL of the resulting cell suspension, trying to avoid large tissue chunks. Place the collected cell suspension in a new, sterile 15-mL conical tube.
-
ix. Add 1 mL of low-ovo solution with DNase I and repeat Steps 24.vi–24.viii.
-
x. Add 1 mL of low-ovo solution with DNase I, then follow Steps 24.vi–24.ix, now triturating the tissue three times through a 21-gauge needle followed by a 23-gauge needle, until the low-ovo solution prepared in Step 18 is used up.
-
-
25. (Optional) To determine cell viability and the effectiveness of the dissociation at this stage, remove a small aliquot (50–100 µL) of cell suspension for counting. Count as described in Step 55.
-
See Troubleshooting.
-
-
26. Pellet the cells at ∼220g for 15 min in a tabletop centrifuge at room temperature.
-
27. Aspirate the supernatant, being careful not to disturb the cell pellet.
-
28. Resuspend the cell pellet in 6 mL of high-ovo solution prepared in Step 10.
-
29. Immediately pellet the cells at ∼220g for 15 min in a tabletop centrifuge at room temperature.
-
Leaving cells for an extended period of time in high-ovo solution will reduce cell viability.
-
-
30. Aspirate the supernatant, being careful not to disturb the cell pellet.
-
31. Resuspend the cell pellet in 6 mL of panning buffer prepared in Step 10.
-
32. Prewet a sterile Nitex mesh filter by filtering 2 mL of panning buffer into a sterile 50-mL tube. Filter the cells into the tube 1 mL at a time, and then rinse the filter with the remaining panning buffer.
Panning
-
Do not allow plates to dry out at any stage.
-
33. Immediately before panning dish use, rinse the panning dish three times with D-PBS.
-
34. Add the cell suspension from Step 32 to a rinsed Ran-2 (rat) or Thy1.2 (mouse) panning plate prepared in Step 6.
-
35. Incubate the plate for 30 min at room temperature, agitating at 15 min to ensure that all cells have an opportunity to adhere to the plate surface.
-
36. Gently shake the plate to loosen the nonadherent cells, and transfer the cell suspension to a rinsed O1 panning plate prepared in Step 6.
-
37. Incubate the plate for 30 min at room temperature, agitating for 15 min to ensure that all cells have an opportunity to adhere to the plate surface.
-
38. Gently shake the plate to loosen the nonadherent cells, and transfer the cell suspension to a rinsed O4 panning plate prepared in Step 6.
-
39. Incubate the plate for 45 min at room temperature, agitating every 15 min to ensure that all cells have an opportunity to adhere to the plate surface.
-
40. Shake the plate to loosen the nonadherent cells and pour off the cell suspension.
-
41. Rinse the plate six to eight times with D-PBS, shaking the plate at each rinse to loosen the nonadherent cells.
-
OPCs adhere very strongly to the O4 panning plate, so shaking the final plate vigorously should not result in a significant loss of OPCs.
-
-
42. Before trypsinization, confirm visually under the microscope that nearly all nonadherent cells have been removed by rinsing. If needed, perform additional rinsing steps.
-
There will always be a small number (<0.5%) of floating cells representing dislodged OPCs at the end of the rinsing steps.
-
See Troubleshooting.
-
OPC trituration. Illustrates Step 24.
Trypsinization
-
See Movie 3 for an illustration of Steps 48 and 49.
-
43. Once the OPCs are in their final D-PBS rinse, transfer 4 mL of the equilibrated EBSS prepared in Step 8 to a sterile tube and add 400 µL of trypsin stock solution.
-
44. Remove the D-PBS from the O4 plate and rinse the plate with the remaining 6 mL of equilibrated EBSS.
-
45. Pour off the EBSS and add the 4 mL of trypsin-EBSS solution prepared in Step 43.
-
46. Incubate the plate for 6–8 min in a 37°C incubator.
-
Optimal trypsinization time should be determined with each batch of stock trypsin solution generated and should correspond to the time at which a large percentage of cells on the plate can be easily released by gentle pipetting. Trypsinization times that are either too short or too long can result in reduced cell viability.
-
-
47. Add 2 mL of the filtered 30% FCS solution prepared in Step 10 to the plate to stop trypsin digestion.
-
48. Dislodge the OPCs from the plate surface by squirting the FCS solution around the plate using a 1-mL pipette tip: Squirt the solution once around the entire circumference toward the center of the dish, once along the edge of the entire dish, and then once concentrating on center. Avoid scraping the tip of the pipette along the surface of the plate; instead squirt just above the surface. Avoid generating excess bubbles in the solution during squirting.
-
49. Remove the cell suspension from plate and place in a sterile 15-mL conical tube.
-
50. Place 5 mL of fresh 30% FCS in the plate and visualize the plate under the microscope to determine if there are particular regions of the plate that still contain adherent cells.
-
Adherent cells are often found along the edges or in the exact center of the plate.
-
-
51. Repeat Steps 48 and 49 to dislodge and collect the remaining OPCs.
-
52. Rinse the plate with the remaining FCS and add the solution to the collection tube to collect the last remaining OPCs.
-
53. Remove a 50- to 100-µL aliquot of the cell suspension for counting.
-
54. Pellet the OPCs at ∼220g for 15 min in a tabletop centrifuge at room temperature.
-
55. During Step 54, determine yield by adding an equal volume of trypan blue to the cell suspension aliquot from Step 53 and count the cells on a hemocytometer slide.
-
Expected yields are as follows:
-
One P6-8 rat brain, 2–2.5 × 10⁶ OPCs
-
One P6-8 mouse brain, 0.8–1 × 10⁶ OPCs
-
One litter (10 pups) P6-8 rat optic nerves, 250 × 103 OPCs
-
-
See Troubleshooting.
-
-
56. After centrifugation, aspirate the supernatant and resuspend the cell pellet in a small volume of DMEM-Sato base growth medium.
OPC trypsinization. Illustrates Steps 48–49.
Plating
-
OPCs are typically plated at a density of 10,000–20,000/coverslip in 24-well plates, 750,000–1,500,000/10-cm plate for immediate differentiation or short-term proliferation, or 1,000–5,000/50,000–200,000 for long term (5–7 d in vitro) proliferation.
-
57. Preplate the OPCs as follows.
Coverslips-
i. Adjust the volume of the cell suspension in DMEM-Sato base growth medium to the number of desired cells per well/50 µL medium.
-
ii. Place a 50-µL spot of cell suspension at the center of the individual coverslips prepared in Step 3.
-
iii. Incubate for 20–45 min at 37°C to let the OPCs adhere to the coverslips.
-
iv. Add the desired medium at 500 µL/well (see Step 58).
-
v. Adjust the volume of the cell suspension in DMEM-Sato base growth medium to the number of desired cells per plate/300 µL medium.
-
vi. Pipette 300 µL of cell suspension into a 10-cm PDL-coated tissue culture plate prepared in Step 2 and carefully spread the liquid with a sterile glass spreader, trying to avoid scraping the glass spreader on the plastic bottom of the plate.
-
vii. Incubate for 7 min at 37°C to let the OPCs adhere to plate.
-
viii. Add the desired medium at 10 mL/plate (see Step 58).
-
ix. Alternatively, add the number of OPCs to be plated to 10 mL of the desired medium and add the solution directly to the PDL-coated 10-cm tissue culture plate.
-
This method results in slightly lower initial OPC viability.
-
-
-
58. Prepare OPC culture medium according to the cells used and the desired result.
-
PDGF, NT-3, and/or T3 may be added to the culture medium to promote OPC proliferation and/or differentiation (Fig. 2). We have found that, in general, withdrawal of mitogens to promote OL differentiation from OPCs leads to the rapid generation (3–4 d) of cultures that are predominantly (>90%) mature OLs, and 5%–10% type-2 astrocytes (by GFAP staining and morphology) if rat OPCs are used, and cultures that are 60%–70% mature OLs and 30%–40% type-2 astrocytes if mouse OPCs are used.
-
-
59. Incubate the OPC cultures at 37°C, 10% CO2; replace 50% of the medium with fresh medium every 2–3 d.
-
To generate highly dense cultures of OPCs, we recommend using 20 ng/mL of PDGF (2× normal concentration) as the OPC cultures begin to get dense (> 25% confluency) to avoid unwanted differentiation. In addition, supplemental PDGF can be added directly to the cultures between feedings.
-
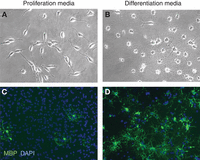
Purified OPCs cultured in proliferation- or differentiation-inducing media. OPCs purified from postnatal day-7 rats were cultured on glass coverslips for 4 d in defined, serum-free media that either contained saturating amount of mitogens (proliferation media [A,C]) or T3 with no mitogens (differentiation media [B,D]). Cells were imaged live on an inverted phase contrast microscope (A,B), or fixed, immunostained for expression of myelin basic protein (MBP, green), and mounted with DAPI to reveal nuclei (blue) (C,D).
TROUBLESHOOTING
Problem (Steps 25 and 55): The final yield of OPCs is low.
Solution: Check the cell count of the total brain supernatant collected in Step 25. For whole brain, the yield at this step should be 20–30 × 106 total cells. If the yield is much lower, the dissociation steps (Steps 17–24) may have been the problem: Either the tissue was not sufficiently dissociated (if there are very few cells), or the trituration was too rough (if there is a very high percentage of trypan blue-positive dead cells). In addition, if the papain enzyme is bad, dissociation will be unsuccessful.
Problem (Steps 42 and 55): The final yield of OPCs is low and the cells were not very dense on the final planning plate at Step 42.
Solution: If the dissociation count in Step 25 is satisfactory, the next most likely source of the problem is the panning plates. If the cells were not very dense on the final panning plate at Step 42, there are several potential reasons.
-
The cells were unhealthy and did not stick to the plate, possibly because of subtle problems in the trituration steps.
-
The cells were rinsed too robustly. (Usually, however, the cells stick strongly to the O4 plate.)
-
The panning buffer was made with D-PBS lacking Ca2+/Mg2+, or insulin was not added to the panning buffer. Either of these errors will lead to the cells not adhering strongly to the panning plates.
-
The protocol was initiated using too much tissue and, thus, there was too much tissue in the panning plates. Excessive cells will block the surface of the plate and prevent the target cells (OPCs) from contacting and adhering to the plate surface.
Problem (Step 55): The final yield of OPCs is low, but the pretrypsinization density of OPCs on the final panning plate was high.
Solution: If the pretrypsinization density of OPCs was high at Step 42, then the trypsinization and final rinsing step might be a problem.
-
If the trypsin solution is too weak, or if the trypsinization time is too short, it is very difficult to dislodge the OPCs from the final panning plate. In addition, cells that are dislodged will be unhealthy, leading to a low final yield. If after 10 min the OPCs are still stuck very strongly to the plate, try adding more trypsin to the plate or making a fresh batch of trypsin.
-
Alternatively, greatly overtrypsinizing the OPCs will also be detrimental to cell health, so if the OPCs come off very easily with one squirt, try reducing the trypsinization time slightly.
- © 2013 Cold Spring Harbor Laboratory Press


