
A Method for Exploring Adult Neurogenesis in the Songbird Brain
- Department of Biology, Neuroscience & Behavior Program, Wesleyan University, Middletown, Connecticut 06459
Abstract
The avian brain is a valuable model for exploring adult neurogenesis. Here we use immunohistochemical methods to detect cell division and the incorporation of new neurons in the adult zebra finch brain. The nonradioactive, relatively inexpensive thymidine analog bromodeoxyuridine (BrdU) is used to label replicating DNA in dividing cells. The brain is harvested, fixed, and dehydrated before being embedded in polyethylene glycol (PEG), which results in superior histology compared to frozen specimens. After the PEG-embedded brain tissue is sectioned and mounted on slides, standard immunohistochemical procedures are used to detect both BrdU and the neuron-specific marker Hu.
MATERIALS
Reagents
Anti-BrdU primary antibody (sheep, polyclonal; Capralogics, SKU: 00013)
Anti-Hu primary antibody (mouse, monoclonal; Life Technologies, #A-21271)
Anti-mouse secondary antibody conjugated with preferred fluorophore (e.g., Cy-3; donkey; Jackson ImmunoResearch Laboratories)
Aqua/Poly Mount (Polysciences, Inc.)
Biotinylated antisheep secondary antibody (donkey)
Blocking buffer (10% [v/v] normal donkey serum in 0.1 m PBST)
Citrate buffer (0.01 m, pH 5.6–6)
Double-distilled water (ddH2O)
Ethanol (50%, 70%, 95%, 100%)
Ketamine (Ketalar, Parke-Davis; 10 mg/mL)
Paraformaldehyde (4%), prepared in 0.1 m PBS (pH 7.4)
Pepsin solution for antigen exposure, freshly prepared
Phosphate-buffered saline (PBS; 0.1 m, pH 7.4)
Phosphate-buffered saline (0.1 m, pH 7.4) containing 0.3% Triton X-100 (PBST)
Polyethylene glycol (PEG; molecular weight [MW] 1000 & 1450; Polysciences, Inc.)
-
PEG stocks are solid at room temperature and must be melted at 47°C for at least 2 d before use (PEG 1000 melting point: 37°C–40°C; PEG 1450 melting point: 43°C–46°C).
Streptavidin conjugated with preferred fluorophore (e.g., Alexa 488; Molecular Probes)
Xylazine (Rompun, Haver; The Butler Co.; 20 mg/mL)
Zebra finches
-
Select the age and sex of the birds depending on the question being asked. Likewise, select the number of birds to be used based on the specific experiment being performed; a general guideline is to use 5–20 birds per experimental group.
Equipment
Cardboard box (small) with a lid
Cardboard tray with lanes made of foam weather stripping (see Step 14)
Desiccant pouch (Drierite)
Dissecting microscope
Forceps, fine
Fume hood
Humid chamber protected from the light
-
Humid chambers can be constructed in many ways. We lay slides horizontally in plastic slide boxes that can hold 100 slides vertically, and place moistened paper beneath them. The lid of the box can be closed to protect the slide from light.
ICC trays (plastic, 4 × 6-well)
Iris scissors, fine
Light microscope with epifluorescence capabilities
Metal slide racks
Microscope slides (positively charged)
Microsyringe, glass
Microtome chuck
Needle, 28-gauge
Osmotic minipumps (optional)
Oven/incubator capable of reaching 50°C
Paint brush (fine-tipped)
Parafilm
Perfusion tray
Plastic embedding molds
Plastic vials
Razor blade, single-edged
Rotary microtome
Scraping tool (e.g., #10075–16; Fine Science Tools)
Sealable plastic bags
Shaker
Steamer (Black & Decker, model HS1050)
Transfer pipettes, plastic
Vacuum oven (optional)
Weights (small glass or plastic)
METHOD
BrdU Labeling and Brain Dissection
BrdU Injections
-
The number of injections per bird and the survival times depend on the question addressed. To analyze the number of mitotically active cells in the ventricular zone, perform a single injection, followed by a short survival time (2–4 h). For quantification of the number of new cells incorporated into a particular brain region, especially in adults where relatively few cells are labeled per day, perform multiple injections over several days (i.e., inject each bird twice daily, at the beginning and end of the light cycle, for 4 d) and use a survival time of roughly 30 d to allow for labeled cells to migrate to their final destination and differentiate (Alvarez-Buylla and Nottebohm 1988; Kirn et al. 1999). For birds larger than the zebra finch, osmotic minipumps can be implanted, which can deliver cell birth markers for a week or longer (see Thompson and Brenowitz 2005), ensuring that the marker is available for uptake by dividing cells that vary in the timing of S phase.
-
1. Measure the weight of the bird by weighing a small cardboard box with a lid and then subtracting its weight from the weight of the bird inside the same box.
-
2. In one hand, gently restrain the bird on its back, using the thumb and fingers to move its wings and feet out of the way to maximize exposure of the breast muscle (musculus pectoralis) to be injected. If desired, use a small amount of 70% ethanol to moisten feathers and spread them for a better view of the muscle. Inject the bird intramuscularly with 6.4 µL of freshly prepared BrdU solution per gram of body weight using a glass microsyringe and 28-gauge needle.
-
This dosage equals roughly 100 mg BrdU/kg body weight. Adult zebra finches weigh 12–15 g, so 1 mL of BrdU solution is sufficient to inject roughly 10 birds.
-
If multiple injections are performed, alternate sides to minimize bruising.
-
-
3. Allow the bird to survive for an appropriate period postinjection.
Perfusion
-
4. Euthanize each bird with a lethal intramuscular injection of 0.175 mL each of ketamine (10 mg/mL) and xylazine (20 mg/mL). Confirm complete anesthesia by ensuring that the birds do not respond to a toe pinch.
-
5. Place the birds on their backs in a perfusion tray in a fume hood with their wings and legs taped down. Use 70% ethanol to moisten the feathers over the breast muscle. Under a dissecting microscope, expose the intraperitoneal cavity by making an incision with fine iris scissors just below the ribcage, while pulling up on the ribcage to avoid cutting internal organs. Enlarge the incision following the edge of the ribcage on either side toward the neck, creating a “flap” that, when lifted, exposes the heart. Rupture the bird's right atrium and perform perfusion using a 28-gauge needle through the bird's left ventricle. Perfuse first with 20 mL of 0.1 m PBS (pH 7.4) followed by 50 mL of 4% paraformaldehyde. Use both solutions at room temperature.
-
6. Decapitate birds and expose the skull by sliding the skin from the neck region toward the beak. Beginning at the back of the skull near the cerebellum, use fine forceps or a scraping tool to chip away the two layers of skull surrounding the sides and top of the brain. Cut and remove the meninges using two pairs of fine forceps, one pair to lift the meninges off the brain and the other to simultaneously pull on them until they tear. Work along the midline between hemispheres to pull the meninges laterally, fully exposing the brain, and remove them.
-
7. Gently lift the brain away from the base of the skull. Sever the cranial nerves, and carefully remove the brain.
-
8. Cut the brain into two hemispheres with a single-edged razor blade.
-
We routinely use sagittal sections, but any plane of sectioning can be used.
-
-
9. Place the brain in fresh 4% paraformaldehyde for 1 h at room temperature.
-
10. Remove the brain from the fixative and incubate for 1 h in 0.1 m PBS with two to three changes of PBS on a shaker at room temperature.
Embedding, Cutting, and Mounting
Dehydration
-
11. Dehydrate the brains separately in plastic vials with increasing ethanol concentrations at room temperature on a shaker. Ethanol concentrations are as follows: 50% for 1 h, 70% for 1 h, 95% for 40 min, and 100% for 35 min.
-
While performing this step, put plastic ICC trays in the incubator to warm. One 4× 6-well ICC tray can be used for processing three brains (six hemispheres).
-
Infiltration/Embedding
-
While not essential, a vacuum oven can be used to shorten infiltration times.
-
12. Use a warmed plastic pipette to fill wells of 4 × 6-well ICC trays with the following PEG solutions. Incubate the dehydrated brain tissue at 47°C in the solutions for the times indicated. Use a suitable glass or metal weight to keep the brain tissue submerged and prevent it from floating. Use warmed forceps to transfer the tissues to the new wells during solution changes.
-
i. PEG 1000 for 1 h
-
ii. PEG 1000/1450 (3:1 ratio) for 3 h
-
iii. PEG 1000/1450 (3:1 ratio) for 8–12 h (overnight)
-
iv. PEG 1450 for 20 min.
-
At the time of the final PEG change, place the plastic embedding molds on a small tray in the incubator to warm, in preparation for embedding.
-
-
-
13. Embed the tissue as follows.
-
i. Fill each plastic embedding mold at least halfway with PEG 1450. Transfer the brain tissue to the plastic embedding mold with the medial surface facing down. Cover the tissue with PEG 1450 using a warmed plastic pipette, making sure the medial surface of the hemisphere remains as close as possible to the bottom of the embedding mold. Add PEG until the molds are ∼¾ full.
-
ii. Carefully take the tray of molds out of the incubator and bring them to room temperature so that the PEG hardens. Place molds in a −20°C freezer for 20 min to accelerate hardening, if desired.
-
The humidity of the room will influence how well PEG solidifies. Optimum relative humidity ranges are between 20% and 30%.
-
-
iii. Store PEG molds at 4°C in a sealable plastic bag with a Drierite desiccant pouch.
-
-
14. Cut the tissue as follows.
-
i. Bring PEG mold to room temperature and place it in the incubator for 30 min at 47°C.
-
This will slightly soften the top of the PEG block for a better seal with the microtome chuck.
-
-
ii. Use a warm plastic pipette to add a layer of fresh, molten PEG 1450 on top of the block. Place a chuck on top of the PEG mold and fill up the rest of the mold with fresh PEG 1450. Bring to room temperature.
-
This will create a block of PEG with brain tissue embedded inside, attached to a chuck for mounting in a rotating microtome.
-
-
iii. Section the tissue.
-
PEG sections can be cut at a range of thicknesses; however, we have had the best success with 6-µm sections using a rotary microtome.
-
Sections come off the microtome in ribbons, which can be stored in a tray made of cardboard with numbered lanes (Fig. 1). The lanes are made with foam weather stripping, which helps preserve the medial-lateral order of ribbons and provides space so that a cardboard cover can be affixed with tape without letting it touch the ribbons. The sections can be mounted onto glass slides immediately or covered trays of sections can be stored at 4°C in a sealed bag with a Drierite desiccant pouch.
-
-
-
15. Mount the tissue as follows.
-
i. If the sections are stored in a sealed bag, bring them to room temperature before unsealing the bag. Break apart ribbons of sections using a fine-tipped, slightly damp paintbrush, if necessary.
-
Wetting the brush too much may lead to dissolving the PEG around a section, which would make the section unrecoverable.
-
-
ii. Float sections on 0.1 m PBS for mounting. Using the paintbrush to orient the section so that the section is above and parallel with the surface of the PBS, gently lower the section onto the PBS with the paintbrush on the underside.
-
Sections should detach from the paintbrush and remain flat on the surface of the PBS.
-
It is essential that a very fine-tipped brush be used.
-
-
iii. Orient floating sections so that they contact the edge of a glass slide set at an angle in the PBS. Raise the slide to lift the section out of the PBS.
-
Use positively charged slides to ensure that the sections do not fall off during subsequent processing.
-
-
iv. Air-dry the sections before proceeding with staining. For immunohistochemistry, put the mounted sections in slide boxes and store in sealed bags with desiccant at −20°C.
-
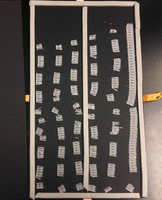
PEG Ribbons on trays. An example of the cardboard storage trays for cut PEG sections. Ribbons of PEG sections can be cut and placed in lanes created using foam weather stripping. Creating lanes helps keep ribbons of sections in their proper sequence during mounting and storage. In this particular image, intact ribbons can be seen at the far right, sections having been detached from the other ribbons and mounted onto slides. Before storage, a cardboard cover is taped over the tray and then the trays are placed in sealed plastic bags with desiccant at 4°C or −20°C.
Immunohistochemistry
Antigen Retrieval
-
16. Lay slides flat on a raised platform in an electric vegetable steamer. Cover sections with enough 0.01 m citrate buffer to cover the surface of the slide, to prevent drying of the tissue. Incubate for 10 min at 95°C–100°C.
-
17. Heat PBS in a glass staining dish and place it in the incubator at 37°C. Place slides into a metal slide rack, and immerse the slide rack in the staining dish. Incubate slides in the PBS for 5 min.
-
18. Incubate slides with pepsin solution for 3 min at 37°C in the incubator.
-
Pepsin incubation is necessary to expose the antigen in PEG sections. When omitted, the signal is reduced substantially.
-
Blocking
-
19. Place drops of 0.1 m PBS directly on each slide and transfer to humid chamber for 5 min at room temperature.
-
All subsequent incubations are performed with the slides laid flat in the humid chamber.
-
-
20. Incubate slides with blocking buffer for 30 min at room temperature.
Incubation with Antibodies and Detection
-
21. Dilute primary antibodies for BrdU (1:100) and Hu (1:40) in blocking buffer. Incubate slides with primary antibody mixture at room temperature overnight.
-
Place rectangular cutouts of Parafilm over slides during the incubation to ensure even distribution of antibody over sections and to prevent drying out.
-
-
22. Wash slides with PBST three times for 5 min each at room temperature.
-
23. Dilute secondary antibodies against sheep (1:200) and mouse (1:1000) with blocking buffer. Incubate slides with secondary antibody mixture for 2 h at room temperature.
-
24. Wash slides with PBST three times for 5 min each at room temperature.
-
25. Incubate slides with fluorophore-conjugated streptavidin (1:800 in PBST) for 2 h at room temperature.
-
26. Wash slides with PBST three times for 5 min each at room temperature.
-
27. Fill a staining dish with ddH2O and dip the slides directly into the staining dish. Add a coverslip using 1 drop of Aqua/Poly Mount per brain section on the slide.
-
28. Examine slides under fluorescence microscope with appropriate filters (Fig. 2).
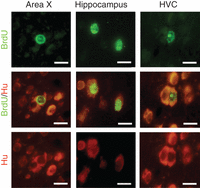
Fluorescence photomicrographs of adult-formed neurons in Area X, the hippocampus, and high vocal center (HVC) from an adult male zebra finch. Row 1: BrdU+ cell nuclei in Area X, the hippocampus, and HVC visualized using a FITC filter. Row 2: The same fields of view showing BrdU+/Hu+ neurons, revealed with a dual FITC-rhodamine filter to show colocalization of the two markers. Row 3: The same fields of view showing Hu+ neuronal label in the cytoplasm, visualized with a rhodamine filter. Scale bars, 10 µm. The fluorophore used for visualizing BrdU was Alexa 488 (Molecular Probes); the neuron-specific protein Hu was labeled with Cy-3 (Jackson ImmunoResearch Laboratories). From Pytte et al. 2007; reprinted with permission from Wiley Periodicals, Inc.
DISCUSSION
Most, if not all, vertebrates continue to produce neurons throughout life (Grandel and Brand 2013). In the avian brain, neurons formed in adulthood are incorporated throughout much of the telencephalon, including cortical and basal ganglia structures, where they replace neurons that have died. Thus, the avian brain produces a variety of neuron types and directs their migration to diverse regions, where they are incorporated into functional circuits. This unprecedented plasticity in a warm-blooded vertebrate makes the avian brain a valuable model for exploring the control and functions of adult neurogenesis in relation to a variety of behaviors and may provide insights for advancing methods of brain repair. For example, neuron addition to the hippocampus has been explored in the context of spatial learning and memory in seed-caching birds (Barnea and Pravosudov 2011). In songbirds, neurons are added to vocal control regions, allowing an appraisal of their potentially unique contributions to the song system, as well as the potential for shared properties of new neurons across brain regions. Moreover, the song system provides the only known case where adult-formed projection neurons are incorporated into motor circuits that control a complex, learned behavior (Kirn 2010). To encourage researchers to explore neurogenesis in birds, we have described here how to detect cell division and the incorporation of new neurons in the adult avian brain using immunohistochemical methods.
There are many ways to label dividing cells or their progeny. [3H]-thymidine was long considered the “gold standard,” because exposed silver grains overlying nuclei and neuropil can be counted, permitting calculation of an unambiguous threshold for deciding whether a cell is labeled (Nottebohm et al. 1994). However, these benefits are countered by the hazards and costs of handling radioactive material. In addition, high silver grain densities can obscure other nuclear markers, especially fluorescent ones. Recently, doublecortin (DCX) has been shown to be expressed transiently in young neurons (Balthazart et al. 2008), providing a method for measuring relatively long-term changes in neuron addition without the need for prior, in vivo exposure to cell division markers—an attribute attractive for studies of wild birds where capture–recapture is needed when measuring conventional cell birth markers. However, recent work indicates that in some brain regions, DCX continues to be expressed at cell ages of 4–12 mo, long after they have differentiated and established projections (Vellema et al. 2014), raising concerns about the utility of DCX as a marker of recently formed neurons. Moreover, in many cases it is desirable to follow a cohort of cells formed in discrete time windows. Nonradioactive thymidine analogs such as BrdU are well suited for this purpose and, when combined with fluorescent secondary antibodies, permit co-localization with nuclear and cytoplasmic markers (Scotto-Lomassese et al. 2007; Walton et al. 2012). Because not all cells formed in the adult brain are neurons, a neuron-specific marker must be used in conjunction with BrdU. A number of such markers are available, some which label only mature or immature neurons. This protocol uses Hu, because it labels neurons regardless of maturational state (Barami et al. 1995). Although frozen sections have certain advantages compared with PEG sections, the latter provides exceptionally good morphology and is compatible with immunohistochemistry (Smithson et al. 1983; Clayton and Alvarez-Buylla 1989).
- © 2014 Cold Spring Harbor Laboratory Press


