
Investigating Physical Chromatin Associations Across the Xenopus Genome by Chromatin Immunoprecipitation
- 1Division of Systems Biology, National Institute for Medical Research, London NW7 1AA, United Kingdom
Abstract
Chromatin immunoprecipitation (ChIP) combined with genomic analysis techniques provide a global snapshot of protein–DNA interactions in the context of chromatin, yielding insights into which genomic loci might be regulated by the DNA-associated protein under investigation. This protocol describes how to perform ChIP on intact or dissected Xenopus embryos. The ChIP-isolated DNA fragments are suitable for high-throughput sequencing (ChIP-Seq) or for quantitative PCR (ChIP-qPCR). In this protocol, embryonic tissue is harvested from Xenopus tropicalis or Xenopus laevis at the developmental stage of interest, and DNA-associated proteins are immobilized to their endogenous genomic binding sites with formaldehyde. Nuclei are extracted from embryos and subjected to sonication so as to shear the chromatin to a size that allows sufficient positional resolution of protein binding to genomic DNA. Chromatin fragments bound by the protein of interest are immunoprecipitated using antibody-coupled beads, washed under high-stringency conditions, and stripped from the beads with anionic detergents. The chemical cross-links are reversed, and the coimmunoprecipitated DNA is purified. The resulting DNA fragments can be analyzed by qPCR or used to create a ChIP-Seq library. General advice for qPCR and for making ChIP-Seq libraries is offered, and approaches for analyzing ChIP-Seq data are outlined.
MATERIALS
Reagents
Agarose gel (1.4%) and reagents for electrophoresis (see Step 27)
Amphibian medium appropriate for Xenopus species of interest (see Step 1.iii)
ChIP-grade antibody (see Steps 5–8)
Dithiothreitol (DTT)
Dynabeads blocking buffer (phosphate-buffered saline A (PBS[A]) containing 0.1% bovine serum albumin [BSA; Sigma-Aldrich A3059])
Formaldehyde solution (36.5%–38%; Sigma-Aldrich F8775)
-
Use the solution within 1 wk after opening the bottle.
HEG solution (optional; see Step 4)
Immunoglobulin (Ig) control (e.g., Santa-Cruz sc-2025 and sc-2027; see Steps 5–8)
Liquid nitrogen
Magnetic beads (see Steps 5–8)
-
Dynabeads M-280 sheep anti-mouse IgG (Invitrogen 11201D)
-
Dynabeads M-280 sheep anti-rabbit IgG (Invitrogen 11203D)
-
Dynabeads Protein A (Invitrogen 10001D)
-
Dynabeads Protein G (Invitrogen 10004D)
NaCl (5 m)
NaF (0.5 m)
Na3VO4 (0.1 m)
Phenylmethylsulfonyl fluoride (PMSF) (Sigma-Aldrich P7626)
Protease inhibitor tablets (complete, EDTA-free, Roche 11836170001[Mini] or 05892953001[Ultra])
Proteinase K (Ambion AM2548)
QIAquick PCR Purification Kit (QIAGEN)
-
Buffer EB, provided with the kit, is the same as 10 mm Tris (pH 8.5).
Qubit Fluorimeter reagents (Invitrogen Q32851) (optional; see Step 46)
Reagents for phenol:chloroform:isoamyl alcohol purification and ethanol precipitation of DNA (optional; see Step 45):
-
Ethanol (80%, 100%)
-
GlycoBlue (Ambion AM9516)
-
Phenol:chloroform:isoamyl alcohol (25:24:1; pH 7.9) (Ambion AM9730)
-
Sodium acetate (3 m, pH 5.2)
-
Water (molecular grade)
RNase A (Invitrogen 12091-039)
TE buffer (10 mm Tris [pH 8.0] and 1 mm EDTA)
Triton X-100 (10%)
Wash solutions for beads (optional; see Step 32)
Xenopus embryos (see Step 1)
Equipment
Conical tubes (15 mL, 50 mL)
Laboratory (support) jack (e.g., Edu-Lab CH0642)
Magnetic rack (Dynal) for microcentrifuge tubes for bead separation (Invitrogen)
Microcentrifuge tubes (1.5 mL, 2 mL)
-
Siliconized low-retention 1.5-mL microcentrifuge tubes (Ambion AM12450) are required for several steps in the protocol.
Oven (e.g., Techne Hybridizer HB-1D) for incubations at 37°C, 55°C, and 65°C
Phase-Lock Gel Heavy tubes (1.5 mL; 5 Prime) (optional; see Step 45)
Plastic beaker (e.g., Azlon 600–800 mL plastic beaker) filled with ice-water for cooling cross-linked chromatin (see Step 17)
Polystyrene tube (15 mL, cut at the 7-mL mark; see Step 16)
Qubit Fluorometer (Invitrogen Q32866) and assay tubes (Invitrogen Q32856) (optional; see Step 46)
Refrigerated tabletop centrifuge for microcentrifuge tubes (e.g., Eppendorf 5415R)
Refrigerated centrifuge for conical tubes (e.g., Eppendorf 5810R)
Rotator (e.g., Stuart SB3)
Scintillation glass vials with caps (e.g., Wheaton 224882)
Sonicator (Misonix 3000 Ultrasonic Liquid Processor) equipped with a tapered 1/16″ microtip (see Steps 16–21)
Thermometer clamp with a total length of 3–4 inches
Thermomixer (e.g., Eppendorf Comfort)
Vacuum aspirator
Vortex (optional; see Step 37)
METHOD
Cross-Linking Proteins to Their Endogenous DNA Binding Sites
-
1. Prepare the embryos.
-
i. Consult Table 1 to estimate the number of embryos required to perform your ChIP experiment.
-
Currently, ∼5–10 million cells expressing the DNA-associated protein of interest are required to create a ChIP-Seq library. For example, at late gastrula stage (Stage 12), ∼200 embryos with ∼40,000 cells each may be enough if the protein is ubiquitously expressed. More embryos are needed accordingly for locally expressed proteins. ChIP-qPCR experiments require only a fraction of these quantities (e.g., ∼100,000–500,000 cells expressing the protein of interest). At gastrula stage, 50 to 100 embryos are generally enough for most ChIP-qPCR experiments assuming that some proteins of interest are only expressed in small parts (up to 1/40th) of the embryo. These empirical numbers may change with varying antibody quality, cross-linking efficiency, and epitope accessibility. See Discussion.
-
-
ii. Harvest dejellied Xenopus embryos, or parts of them, at the developmental stage of interest.
-
Embryos can be harvested and dejellied according to Sive et al. (2007).
-
-
iii. Transfer the embryos to a scintillation glass vial and wash them once in the appropriate amphibian medium.
-
We use 0.01× MMR for Xenopus tropicalis embryos or 0.1× NAM for Xenopus laevis.
-
-
-
2. Fix whole embryos by adding formaldehyde to a final concentration of 1% in the appropriate amphibian medium (e.g., 260 µL formaldehyde solution [36.5%–38%] in 9 mL amphibian medium). Incubate the embryos in the fixative at room temperature for 20–25 min (X. tropicalis) or 30–35 min (X. laevis).
-
The appropriate fixation time to immobilize proteins on DNA must be determined empirically and varies according to frog species, developmental stage, DNA binding properties, and antibody epitope. The indicated time range is a good starting point for fixing gastrula-stage embryos. Embryos of later stages or dissected parts are normally fixed for a shorter time, such as 15 min (X. tropicalis) or 20–25 min (X. laevis) for late neurula/early tailbud embryos. Xenopus laevis embryos are fixed longer because of their bigger size. See Discussion.
-
-
3. Remove the fixative by quickly washing embryonic tissue three times with the appropriate ice-cold amphibian medium.
-
This inconspicuous washing step is key for extracting nuclei from cross-linked tissue and then efficiently shearing chromatin (see Discussion). At this stage, embryos are very fragile and should not come into contact with the liquid surface.
-
These fixed embryos can be used immediately (see Step 10); alternatively, they can be frozen and stored for later use as described in Step 4.
-
-
4. (Optional) Freeze and store the embryos as follows.
-
i. Carefully transfer the embryonic tissue (e.g., groups of 250 embryos or fewer) into prechilled 2-mL microcentrifuge tubes. Remove as much remaining medium as possible from the embryos.
-
ii. Add approximately one volume (equivalent to the volume of embryonic tissue) of ice-cold HEG solution.
-
iii. Allow the embryos to settle to the bottom of the tube and remove the excess HEG.
-
iv. Snap-freeze the embryos in liquid nitrogen and store at −80°C for future use.
-
Number of cells per embryo during early Xenopus development
Coupling ChIP-Grade Antibody to Magnetic Beads
-
At least 1 h before immunoprecipitation (Step 31), magnetic beads of the appropriate type (usually anti-IgG or protein A/G) are blocked and coupled to a ChIP-grade antibody. Use the following guidelines as a starting point for X. tropicalis embryos. For ChIP-qPCR experiments, nonspecific Ig of the antibody isotype are also coupled to the beads to be used as a control.
-
5. Transfer the required volume of resuspended magnetic beads (see Table 2) into a siliconized low-retention 1.5-mL microcentrifuge tube on ice.
-
6. Remove the Dynabeads buffer from the magnetic beads by leaving the tube in its magnetic rack for 20-30 sec and then decanting or withdrawing the buffer with a pipette, being careful not to disturb the beads.
-
7. Wash the beads three times (5 min each) in Dynabeads blocking buffer by rotating the tubes on a rotator (10 rpm) at room temperature. After each wash, remove the buffer as described in Step 6.
-
8. Add the appropriate amount of antibody (or Ig control) to the beads (see Table 2) and adjust the total volume to 400 µL (to ensure mixing) with blocking buffer. Saturate the beads with antibodies by rotating the tubes on a rotator (10 rpm) for 1 h at room temperature or overnight at 4°C.
-
The antibody-saturated beads will keep from several days to weeks at 4°C depending on the antibody, but it is best to use them in Step 28 immediately or within 1–2 d.
-
Coupling affinity-purified antibodies to magnetic Dynabeads M-280 sheep anti-rabbit/mouse IgG
Extracting Nuclei from Fixed Embryos
-
The extraction of nuclei from fixed embryonic tissue works best with fixation times as outlined in Step 2 and no more than 50–80 X. tropicalis gastrula-stage embryos or 25–40 X. laevis gastrula-stage embryos per milliliter of extraction buffer (E1, E2, and E3). If more embryos are required for a ChIP experiment, it is best to use multiple 2-mL microcentrifuge tubes or 15- or 50-mL conical tubes. Because the yolk content decreases during development, it may be possible to increase the number of embryos per milliliter of extraction buffer after the gastrula stage. During Steps 9–15, keep all biological samples and solutions on ice.
-
9. Supplement the extraction buffers E1, E2, and E3 (Lee et al. 2006) as follows immediately before use.
-
i. Supplement all three buffers with 0.2 mm PMSF and protease inhibitor tablets (1 mini tablet per 10 mL or 1 ultra tablet per 50 mL).
-
ii. Supplement buffer E1 with 1 mm DTT.
-
iii. If it is necessary to block phosphatase activity, to each of the buffers add NaF to a final concentration of 5 mm and Na3VO4 to 2 mm.
-
-
10. Homogenize the fixed embryonic tissue with E1 by pipetting up and down. Centrifuge the homogenate at 1000g for 2–5 min in a refrigerated (4°C) centrifuge, and then aspirate the supernatant and any lipids attached to the wall.
-
11. Resuspend the pellet in E1, keep the suspension on ice for 5–10 min, and then centrifuge and aspirate as in Step 10.
-
12. Resuspend the pellet in E2, and then centrifuge and aspirate as in Step 10.
-
13. Repeat Step 12, but keep the suspension on ice for 5–10 min before centrifugation.
-
14. Resuspend pellet in E3, and then centrifuge and aspirate as in Step 10.
-
The anionic detergents deoxycholate and N-lauroylsarcosine in E3 facilitate solubilization of yolk platelets. This step thus facilitates the separation of yolk from a fairly pure population of cross-linked nuclei (Gentsch et al. 2013). On very efficient extraction of cross-linked nuclei, the nuclear pellet is hardly visible. However, it may appear brown because of some unsolubilized pigment particles. Note that without formaldehyde-mediated cross-linking, these anionic detergents would solubilize the chromatin and this purification step would not work.
-
-
15. Resuspend the pellet of cross-linked nuclei in a total volume of at least 500 µL of E3 for sonication. If the nuclear suspension appears very viscous, dilute it with E3 to a total volume of 1–3 mL. If several samples were created, pool them at this stage (i.e., before sonication).
Shearing Cross-Linked Chromatin
-
Shearing of cross-linked chromatin can be achieved by sonication with a commercially available sonicator. Here we describe the parameters used with a Misonix Sonicator 3000 Ultrasonic Liquid Processor equipped with a tapered 1/16 inch (1.6 mm) microtip. Other laboratories have successfully used different sonicators such as those from Branson or Covaris. When using these sonicators, follow the manufacturers' instructions and optimize the parameters empirically.
-
16. Score and clip a 15 mL polystyrene tube at the 7 mL mark, for use as a vessel for shearing chromatin.
-
17. Transfer the solution with cross-linked nuclei into this conical tube, and keep it chilled during sonication by attaching the tube to a plastic beaker filled with ice water via a short thermometer clamp. With a laboratory jack, move the beaker/tube vertically and horizontally so that the sonicator microtip is immersed in the sample to about two-thirds of the volume depth and properly centered without contacting the tube wall.
-
Off-center positioning of the microtip relative to the tube can cause frothing of the sample.
-
-
18. Sonicate the sample of cross-linked nuclei. Expose the sample to 10–14 cycles of 30-sec shock waves followed by 1-min pauses to avoid overheating the sample. Start sonication with a power setting of 1.0 W, and change the power setting (depending on volume and ionic strength of sample) to reach 6–12 W for efficient shearing. If the sample begins to froth, pause immediately, reposition the tube, and wait until the froth disappears before resuming sonication.
-
These settings produce an asymmetric DNA fragment distribution in the range of 100–500 bp, peaking at ∼200–300 bp (Fig. 1).
-
-
19. After sonication, transfer the chromatin solution into microcentrifuge tubes, and remove the debris by centrifuging at full speed (>15,000g) for 10 min at 4°C.
-
20. Transfer the clear supernatant containing solubilized and sheared chromatin to a clean, prechilled 1.5-mL microcentrifuge tube.
-
21. Collect a chromatin sample (∼50 µL) corresponding to ∼400,000 or more nuclei (∼10 gastrula embryos) to check the efficiency of chromatin shearing (see Steps 22–27). Use the remaining chromatin for immunoprecipitation (see Steps 28–38). Keep it at 4°C if it will be used on the same or following day; alternatively, snap-freeze the sample in liquid nitrogen and store it at −80°C for later use.
-
Storage at 4°C or at −80°C does not affect the outcome.
-
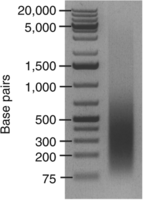
Sonication-mediated shearing of cross-linked chromatin from gastrula embryos. The image shows the results of gel electrophoresis of genomic DNA purified from cross-linked chromatin. The chromatin sample was sheared by 10 cycles of sonication (30-sec shock waves followed by 1-min pauses) at 6–9 W.
Checking the Efficiency of Chromatin Shearing
-
Efficient shearing of chromatin is important, because the resultant fragment size distribution determines the positional resolution of binding events. This is particularly true for ChIP-qPCR, which does not include a fragment size-selection step before PCR amplification.
-
22. Add at least one volume of fresh SDS elution buffer to the chromatin sample (e.g., 50 µL of SDS elution buffer to 50 µL of solubilized chromatin).
-
23. Add 1/20 volume of 5 m NaCl to the chromatin solution (e.g., ∼5 µL of 5 m NaCl to ∼100 µL of sample) to enhance the reversal of cross-links at 65°C.
-
24. Incubate the chromatin solution for 6–15 h (overnight) in an oven set to 65°C.
-
25. Add proteinase K to the chromatin solution to a final concentration of 200 µg/mL (e.g., ∼1 µL of 20 µg/µL proteinase K to ∼100 µL of sample). Incubate for 2 h at 55°C.
-
26. Purify the DNA fragments using the QIAquick PCR Purification Kit according to the manufacturer's instructions. Elute the DNA with 30 µL of Buffer EB (provided with the kit).
-
27. Add ∼4 µg of RNase A to remove any residual RNA. Incubate for 5 min at 37°C before running the entire sample on a 1.4% agarose gel by electrophoresis.
-
An asymmetric DNA fragment distribution should be visible, mainly within the range of 100–500 bp, peaking at ∼200–300 bp (Fig. 1). If shearing of cross-linked chromatin was successful, continue with Step 28; otherwise, see Troubleshooting.
-
Immunoprecipitation of Sheared Chromatin
-
Use siliconized low-retention 1.5 mL microcentrifuge tubes to collect chromatin at any given step. Use 1.0–1.4 mL of indicated buffer to wash beads at any washing step.
-
28. Wash the beads coupled to antibody (or Ig control) from Step 8.
-
i. Wash the beads twice (5 min each) in Dynabead blocking buffer by rotating the tubes on a rotator (10 rpm) at 4°C. After each wash, remove the Dynabeads buffer from the magnetic beads by leaving the tubes in their magnetic rack for 20–30 sec and then decanting or withdrawing the buffer with a pipette, being careful not to disturb the beads.
-
ii. Wash the beads once (for 5 min) in buffer E2 containing 1% Triton X-100 by rotating the tubes on a rotator (10 rpm) at 4°C. Remove the buffer as in Step 28.i.
-
-
29. From the sheared chromatin preparation (Step 21), collect a sample that is equivalent to 3%–10% of the ChIP input (e.g., if the 275-µL sample in Step 31 will contain ∼250 µL of sheared chromatin, take ∼25 µL here). Transfer the sample to a new tube and store at 4°C.
-
This sample will be processed further once the ChIP samples are ready for the reversal of cross-links (Step 39), and used as input to create locus-specific qPCR standard curves or ChIP-Seq control libraries.
-
-
30. To the sheared chromatin from Step 21, add ice-cold 10% Triton X-100 to a final concentration of 1% (e.g., add 55 µL of 10% Triton X-100 to a 500-µL volume of sheared chromatin).
-
31. Add the sheared chromatin from Step 30 to the beads from Step 28. If using an Ig control (for a ChIP-qPCR experiment), add half of the sheared chromatin from Step 30 to the beads coupled to antibody and the other half to the beads coupled to the Ig control (i.e., add 275 µL of sample from Step 30 to each tube). Incubate on a rotator (10 rpm) overnight at 4°C.
-
32. The following day, wash the beads extensively.
-
i. Remove the unbound chromatin from the magnetic beads by leaving the tubes in their magnetic rack for 20–30 sec and then decanting or withdrawing the solution with a pipette, being careful not to disturb the beads.
-
ii. Wash the beads four times (for ChIP-qPCR) or ten times (for ChIP-Seq) (5 min each) with prechilled RIPA buffer by rotating the tubes on a rotator (10 rpm) at 4°C. Remove the buffer as in Step 32.i.
-
iii. Wash the beads once (for 5 min) in prechilled TEN buffer by rotating the tubes on a rotator (10 rpm) at 4°C. Remove the buffer as in Step 32.i.
-
Different washing conditions such as higher salt concentrations (giving higher stringency) can be used to improve the signal-to-noise ratio. The following washing buffers have also frequently been used in the indicated order: low-salt solution buffer, high-salt solution buffer, and LiCl solution buffer.
-
For ChIP-Seq, continue with Step 33; for ChIP-qPCR, skip to Step 36. Steps 33 to 35 help to reduce the number of background fragments in a ChIP-Seq experiment. These steps are not required when performing ChIP-qPCR.
-
-
-
33. Resuspend the beads in 50 µL of prechilled TEN buffer, and transfer the bead suspension to a new tube. If several tubes of the same ChIP experiment are in use, pool the samples at this stage.
-
34. Use the magnetic rack to assemble beads at the bottom of the tube.
-
35. Centrifuge the tube at 1000g for 1 min at 4°C, and remove the supernatant while keeping the bottom of the tube adjacent to the magnetic rack.
-
The combination of Steps 34 and 35 ensures that the beads are collected at the bottom of the tube. Centrifugation alone may not be sufficient; some heads can stick to the tube wall in the absence of any detergent.
-
-
36. Add fresh SDS elution buffer to beads. Use 100 µL for ChIP-qPCR or 200 µL for ChIP-Seq.
-
The recovery of immunoprecipitated DNA may be improved by eluting twice with SDS elution buffer, using either 50 µL (for ChIP-qPCR) or 100 µL (for ChIP-Seq) each time.
-
-
37. Shake the beads for 15 min in a thermomixer set to 1000 rpm and 65°C.
-
Alternatively, shake the beads every 5 min on a vortex. During the interim, incubate at 65°C.
-
-
38. Centrifuge the tube at full speed (>15,000g) for 30 sec at room temperature. Transfer the supernatant to a new tube.
-
If the DNA is to be eluted twice, repeat Steps 36–38, and then transfer the supernatant from the second elution to the tube containing the supernatant from the first elution.
-
Recovery and Extraction of the DNA
-
39. Add at least one volume of fresh SDS elution buffer to the input sample collected at Step 29, typically to a final volume of 100 µL (for ChIP-qPCR) or 200 µL (for ChIP-Seq).
-
40. Add 1/20 volume of 5 m NaCl to all ChIP and input samples (e.g., add ∼5 µL of 5 m NaCl to ∼100 µL of sample).
-
41. Incubate the chromatin solution(s) for 6–15 h (overnight) in an oven set to 65°C.
-
42. Dilute the samples with one volume of TE buffer (e.g., add ∼100 µL of TE buffer to ∼100 µL of sample from Step 41).
-
43. Add RNase A to a final concentration of 200 µg/mL (e.g., add ∼2 µL of 20 µg/µL RNase A to ∼200 µL of sample from Step 42). Incubate for 1 h at 37°C.
-
44. Add proteinase K to a final concentration of 200 µg/mL (e.g., add ∼2 µL of 20 µg/µL proteinase K to ∼200 µL of sample from Step 43). Incubate for 2–4 h at 55°C.
-
45. Extract the DNA fragments using the QIAquick PCR Purification Kit or phenol:chloroform:isoamyl alcohol purification followed by ethanol precipitation.
-
To extract DNA using the kit:
-
i. Follow the manufacturer's instructions for the QIAquick PCR Purification Kit.
-
ii. Add 3 M sodium acetate (pH 5.2) as outlined in the manufacturer's instructions (Step 2).
-
iii. Elute the DNA with 30–80 µL of Buffer EB prewarmed to 50°C.
-
-
To extract the DNA using phenol:chloroform:isoamyl alcohol purification and ethanol precipitation:
-
i. Prespin 1.5-mL Phase-Lock Gel Heavy tubes at 12,000g for 30 sec at room temperature.
-
ii. Transfer the DNA samples from Step 44 to the prespun tubes, add one volume of phenol:chloroform:isoamyl alcohol (25:24:1; pH 7.9), and mix the samples by inverting the tubes four to six times.
-
iii. Centrifuge the tubes at full speed (>15,000g) for 5 min at room temperature.
-
iv. Transfer the upper (aqueous) phase to a fresh tube. Add 1/25 volume of 5 m NaCl, two volumes of 100% ethanol, and 15 µg of GlycoBlue. Mix the sample by inverting the tube four to six times.
-
v. Incubate the samples overnight at −20°C.
-
vi. Centrifuge the samples at full speed (>15,000g) for 1 h at 4°C, and then discard the supernatant without disturbing the blue DNA pellet.
-
vii. Wash the pellet with 500 µL of 80% ethanol.
-
viii. Centrifuge the samples at full speed (>15,000g) for 3 min at 4°C, and then discard the supernatant without disturbing the blue DNA pellet.
-
ix. Air-dry the DNA pellet for 5–10 min at room temperature.
-
x. Add 32 µL of molecular-grade water to the dry DNA pellet, and leave samples on ice for at least 2 h to ensure that the DNA is completely dissolved.
-
We prefer to use the QIAquick PCR Purification Kit for ChIP-qPCR because of its high reproducibility and time efficiency, and phenol:chloroform:isoamyl alcohol purification followed by ethanol precipitation for ChIP-Seq because of its superior DNA purification and recovery yield. After extraction, the DNA is ready for qPCR or for making ChIP-Seq libraries (see Discussion). ChIP-isolated DNA samples can be stored at −20°C.
-
-
-
46. If the goal is to create ChIP-Seq libraries, quantify 1 µL of the immunoprecipitated DNA and the diluted input DNA using the Qubit Fluorometer (or an equivalent spectroscopic instrument).
-
A total of 5–10 ng of DNA is currently required for creating a robust single-end ChIP-Seq library using the Illumina protocol (see Discussion).
-
TROUBLESHOOTING
Problem (Step 27): The DNA fragments are longer or shorter than expected (i.e., average >500 bp).
Solution: Try shearing the chromatin again, beginning at Step 16. However, poor shearing efficiency often relates to inefficient nuclear extraction or prolonged cross-linking rather than inefficient sonication (see Discussion). Stronger chromatin shearing can be achieved by moderately increasing either or both the sonication power and/or the concentration of anionic detergents such as N-lauroylsarcosine, deoxycholate, or SDS. Be aware that stronger sionication may cause the sample to froth and epitopes to be stripped off the chromatin. In addition, higher concentration of anionic detergents can render the ChIP ineffective as antibodies uncouple from the beads and their epitope affinity is reduced. This denaturation may be alleviated by diluting the sheared chromatin samples before adding the antibody-coupled beads.
Problem: Immunoprecipitation is poor (no or low-level enrichment) as judged by ChIP-qPCR with positive and negative controls (see Discussion).
Solution: We encountered that some ChIP-grade antibodies are not compatible with the use of N-lauroylsarcosine. Modify E3 recipe by replacing N-lauroylsarcosine with 0.1% SDS. Alternatively, try another antibody as not all antibodies are suitable for ChIP.
DISCUSSION
This protocol was devised to prepare ChIP-isolated DNA from Xenopus embryos for sequencing (ChIP-Seq) or for qPCR. It includes modifications from standard protocols (Jallow et al. 2004; Buchholz et al. 2005; Lee et al. 2006; Acevedo et al. 2007) that allow for the high yolk content of Xenopus embryos. It provides an alternative to other protocols (Blythe et al. 2009; Akkers et al. 2012) and can be easily scaled up to process thousands of embryos, which are sometimes required to create robust ChIP-Seq libraries. It has been successfully tested with embryos from both X. tropicalis and X. laevis, as well as from the zebrafish Danio rerio (Gentsch et al. 2013; Miyamoto et al. 2013).
Comments on the ChIP Procedure
The number of embryos required for a particular ChIP experiment depends on the number of cells expressing the nuclear protein of interest, average DNA occupancy levels within nuclei, DNA cross-linking efficiencies, and the ChIP-grade quality of the antibody used. Normally, fewer embryos are required for ChIP when epitope-tagged fusion proteins are introduced. In this case, embryos not expressing this construct may be used as a negative control. This method can be legitimate and informative when ChIP-grade antibodies are not available or if there are not enough cells expressing the protein of interest (Mazzoni et al. 2011). However, bear in mind that DNA occupancy levels will reflect exogenous (nonnative) expression.
Based on shearing efficiency experiments, nuclei of later-staged embryos seem more susceptible to formaldehyde fixation than those of gastrula or pregastrula embryos, perhaps because of the gradual depletion of yolk during early embryogenesis. Fixation time may also be extended up to 1 h for proteins indirectly associated with DNA. However, under conditions of prolonged fixation, chromatin shearing becomes more difficult and requires more rounds of sonication than recommended in this protocol (Step 18).
The embryos are washed in amphibian medium immediately after fixation (Step 3); these washes facilitate efficient shearing of the chromatin and do not contain glycine. We have found that immediate quenching with glycine makes the extraction of fixed nuclei very difficult. Glycine is generally thought not to have cross-linking capacity. However, because of its monovalent nature, the formaldehyde–glycine (Schiff-base) adduct can further react with amino-terminal amino groups or arginine residues (Metz et al. 2004). It is not clear, however, whether this, or the fact that Xenopus cells are relatively rich in yolk, is the reason for the problems that were encountered.
Analyzing ChIP-Isolated DNA by qPCR
In ChIP-qPCR, DNA enrichment is quantified relative to locus-specific standard curves or by the 2−ΔΔC(T) method using real-time PCR (Livak and Schmittgen 2001; Blythe et al. 2009). DNA occupancy levels can be visualized as a percentage of input DNA (see Fig. 2A) or as a ratio of ChIP versus Ig control. If known, include a negative (not bound) control locus as well as a positive (bound) control locus. A successful ChIP experiment yields significant DNA enrichment for protein binding at positive control loci and no enrichment at negative control loci. The antibody control (nonspecific immunoglobulins) should not give any enrichment at positive or negative control loci (see Troubleshooting).
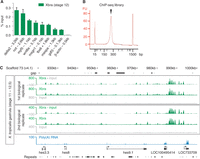
Mapping physical chromatin associations across the X. tropicalis genome by ChIP-qPCR and ChIP-Seq. (A) DNA occupancy levels of Brachyury (Xbra) at various genomic loci as determined at the late gastrula stage by ChIP-qPCR. DNA occupancy levels are indicated as percentage (%) of input. The genomic locus upstream of the housekeeping gene β-actin is used as a negative control (not bound by Xbra). Error bar, standard deviation from mean (biological duplicates). (B) Microfluidics-mediated quality control of a ChIP-Seq library with an average fragment length of ∼270 bp, visualized with lower (15 bp) and upper (1500 bp) ladder markers. FU, fluorescence units. (C) Excerpt of a genome-wide Brachyury (Xbra) binding profile as determined at gastrula stage by ChIP-Seq showing the hairy and enhancer of split (hes) gene cluster (hes3.3, hes8, hes9.1, LOC100495414, and LOC733709). Profiles are pile-ups of extended reads from ChIP and input libraries (biological replicates) mapped to genome draft 4.1. The input profile was subtracted from the ChIP profile for normalization purposes. Data sets for A and C are from Gentsch et al. (2013), and the poly(A) RNA track in C is from Akkers et al. (2009).
Creating and Analyzing ChIP-Seq Libraries
We use the ChIP-Seq Sample Prep Kit (Illumina IP-102-1001) to create ChIP-Seq libraries. The same amounts of input and of ChIP DNA should be used to create separate libraries according to the manufacturer's instructions. We recommend the use of DNA Clean & Concentrator-5 Kit (Zymo Research) to purify DNA, E-gel (Invitrogen) to size-select DNA fragments, and solid-phase reverse immobilization beads to remove adaptors and primer dimers from the final PCR reaction. Libraries should be quantified by fluorometry and quality-controlled on microfluidics-based platforms. A good-quality library suitable for deep sequencing shows a single bell-shaped distribution of DNA fragments of the selected size (Fig. 2B) and does not contain any primer/adaptor dimers (peak ∼70–100 bp). Mapped reads of the input library will be subtracted from the genome-wide ChIP profile to account for any shearing bias and other experimental artefacts.
In the remaining discussion, we briefly outline our approach for analyzing ChIP-Seq data derived from X. tropicalis embryos. However, there are several other tools that offer equivalent or perhaps even better postsequencing analyses. Some tools may not work well because of the fragmented state of the current X. tropicalis genome draft (JGI4.1 or JGI7.1).
On sequencing of the library on a deep sequencing platform, the read quality can quickly be verified with FastQC (developed by S. Andrews at the Babraham Institute, UK). Only reads with unambiguous matches are subsequently mapped to the Xenopus genome using a read aligner such as Bowtie (Langmead et al. 2009; Langmead and Salzberg 2012). To find regions of DNA fragment enrichment, or so called peaks, several programs are available such as MACS (Zhang et al. 2008; Feng et al. 2012), PeakSeq (Rozowsky et al. 2009) or SPP (van Rooijen et al. 2012). We prefer MACS, which accepts the compressed (binary) file of mapped reads (BAM-file) and delivers genomic coordinates, p-values and rate of false discoveries for each peak in the format of an excel spreadsheet or bed file. It also supports the comparison of ChIP versus input (control) DNA (two-sample analysis based on Poisson distribution of reads), which is important because the control distribution of reads features nonrandom enrichment. In addition, it produces bedGraph files, which, once converted into the bigWig format, can be displayed as custom tracks on the UCSC Genome Browser (Fig. 2C) or the Integrative Genomics Viewer (Robinson et al. 2011). The nearest genes to peaks can be found by ranking distances between peak summits and transcription start sites using query language MySQL or by running a Perl script (annotatePeaks.pl) from HOMER (Heinz et al. 2010). Genomic features such as gene coordinates, name and description can be downloaded from the Ensembl browser via BioMart (http://www.ensembl.org/biomart/) or from the UCSC Genome Browser via the Table Browser as a tab-separated plain text file. The extraction of statistically enriched DNA motifs over background from peak regions can be achieved by online platforms such as cisFinder (Sharov and Ko 2009) or MEME (Storey et al. 1995). The HOMER script collection also contains useful command-line tools to create read (tag) density matrices aligned to any chosen genomic element such as transcription start sites or transcription factor binding sites. These matrices, possibly including several ChIP-Seq experiments, can be clustered and visualized with an open-source software combination of Cluster3 (Eisen et al. 1998; de Hoon et al. 2004) and JavaTreeview (http://jtreeview.sourceforge.net/) or functional language R/Bioconductor. The latter provides a wealth of readily developed tools to combine ChIP-Seq with other types of data sets such as those supporting differential gene expression analyses.
ACKNOWLEDGMENTS
We thank C. Brenner for implementing the X. tropicalis genome into HOMER and the Smith and Gilchrist labs for discussions and advice. All Xenopus studies complied fully with the UK Animals (Scientific Procedures) Act 1986 as implemented by the MRC National Institute for Medical Research. This work was supported by the Wellcome Trust and the Medical Research Council (program number U117597140). The authors declare no conflict of interest or competing financial interest.
Footnotes
-
↵2 Correspondence: ggentsc{at}nimr.mrc.ac.uk, director{at}nimr.mrc.ac.uk
- © 2014 Cold Spring Harbor Laboratory Press


