
Fluorescent In Situ Hybridization in Embryos of the African Turquoise Killifish Nothobranchius furzeri
- ↵2Correspondence: abitua{at}uw.edu
Abstract
Precisely where and when a given gene is expressed is crucial for our understanding of developmental and cell biology but determining this is often constrained by detection limits. Here, we describe a technique for visualization of low-copy mRNA in Nothobranchius furzeri embryos using tyramide signal amplification (TSA). In this protocol, an anti-sense digoxigenin-labeled RNA probe is hybridized to mRNA in situ. Anti-digoxigenin antibodies conjugated to horseradish peroxidase (POD) are then bound to the probe and reacted with fluorescently labeled tyramide. Combining this method with a counterstain, such as DAPI, allows for the detection of mRNA at a single-cell resolution.
MATERIALS
Reagents
Agarose (low-melting-temperature; Sigma-Aldrich A9414)
Anti-digoxigenin-POD, Fab fragments (Roche 11207733910)
Anti-sense digoxigenin-labeled RNA probes (20 ng/µL)
-
Choose probes according to experimental aims.
DAPI (Thermo Fisher D1306)
FISH hybridization buffer for Nothobranchius
Methanol (100%)
Methanol (25%, v/v, 50%, v/v, and 75%, v/v, in 0.05% PBTween)
Nothobranchius furzeri embryos
-
Use embryos of the appropriate stage for the experimental aims prepared according to (Protocol: Breeding and Reproduction of the African Turquoise Killifish Nothobranchius furzeri [Chen et al. 2023]).
Paraformaldehyde (4%) buffered in 0.05% PBTween
Phosphate buffered saline (PBS; 10×; Thermo Fisher AM9624)
Prehybridization buffer for Nothobranchius
Proteinase K (Roche 3115836001)
TNT wash buffer for Nothobranchius
TSA Cyanine 3 System (Akoya NEL704A001KT)
Equipment
Confocal microscope (upright or inverted)
Fluorescence stereoscope (optional; Step 40)
Forceps (Dumont #5CO)
Forceps (Dumont #5SF)
Hybridization oven preset to 65°C (Problot 12; Labnet H1200A)
Incubator preset to 42°C
Microcentrifuge tubes (2-mL Seal-Rite, USA Scientific 1620-2799)
Microsample incubator (Hybex, Scigene 1057-30-O)
Pasteur pipette (glass)
Petri dish (65-mm, coated with 0.5 cm of Sylgard 184 according to the manufacturer's instructions)
Rocking platform
METHOD
Day 0: Fixation and Storage of N. furzeri Embryos
-
1. Transfer the embryos to a 2-mL Seal-Rite microcentrifuge tube using a glass pasture pipette and fix using 0.5 mL of 4% paraformaldehyde buffered in 0.05% PBTween overnight at 4°C.
-
At least 12 embryos per mRNA probe is recommended in each tube.
-
-
2. Rinse embryos in 0.05% PBTween at room temperature and transfer to a Sylgard 184-coated 65-mm Petri dish containing enough 0.05% PBTween to submerge the embryos.
-
3. Carefully manually remove the chorion from each embryo using Dumont #5CO forceps in your nondominant hand for stabilization, and Dumont #5SF forceps in your dominant hand to peel away the chorion. The incision with forceps should be made near the oil droplet to avoid damage.
-
Embryos fixed at 40% epiboly (a stage where the surface ectoderm has spread over 40% of the yolk) or earlier should be dechorionated after methanol rehydration (see Day 1, Step 6). This prevents the blastula from falling off the yolk.
-
See Troubleshooting.
-
-
4. Carefully place embryos back in a 2-mL Seal-Rite microcentrifuge tube and dehydrate them in the following methanol series, removing the solution after each wash. Incubate embryos in 700 µL of each solution for 5 min at room temperature without agitation.
-
i. 0.05% PBTween
-
ii. 25% methanol in 0.05% PBTween
-
iii. 50% methanol in 0.05% PBTween
-
iv. 75% methanol in 0.05% PBTween
-
v. 100% methanol
-
-
5. Store embryos in a 2-mL Seal-Rite microcentrifuge tube in 100% methanol for a minimum of 2 h at −20°C.
-
This step is critical to permeabilize the embryos for efficient probe penetration. Embryos can be stored this way for several months at −20°C. Dehydrated embryos will become discolored and opaque; however, they become clear again after rehydration.
-
Day 1: Rehydration of N. furzeri Embryos and Incubation with mRNA Probes
Embryo Preparation
-
The embryos are fragile; therefore, to prevent tissue damage, do not agitate the embryos in any of the following incubations and washes (except for gentle rocking in Step 26).
-
6. Rehydrate embryos by incubating them in 700 µL of each solution from the following methanol series for 5 min at room temperature.
-
i. 75% methanol in 0.05% PBTween
-
ii. 50% methanol in 0.05% PBTween
-
iii. 25% methanol in 0.05% PBTween
-
iv. 0.05% PBTween. Perform this incubation three times.
-
-
7. Digest the tissue in 700 µL of 10 µg/mL proteinase K in 0.05% PBTween at room temperature using the following time guide:
-
Early tailbud embryos (96 h postfertilization at 28°C): 5 min.
-
Late tailbud embryos (120 h postfertilization at 28°C): 15 min.
-
Later stage embryos (144 h postfertilization and beyond at 28°C): trial and error.
-
This step is not required for blastula and gastrula. The duration of proteinase K treatment is dependent on the size and type of the tissue. Underdigestion will result in poor RNA probe penetrance, whereas overdigestion will adversely affect tissue integrity.
-
-
-
8. Wash the embryos in 1 mL of 0.05% PBTween at room temperature to stop the reaction.
-
If proteinase K was not used, this step can be omitted.
-
-
9. Refix the embryos in 700 µL of 4% paraformaldehyde in 0.05% PBTween for 20 min at room temperature.
-
10. Wash the embryos five times in 0.05% PBTween for 5 min each time at room temperature.
Probe Incubation
-
See Protocol: Synthesis and Purification of Digoxigenin-Labeled RNA Probes for In Situ Hybridization (Sive et al. 2007) for information on probe synthesis.
-
11. Depending on the number of probes you plan to use, divide the embryos equally into 2-mL Seal-Rite microcentrifuge tubes containing enough 0.05% PBTween to submerge the embryos.
-
For example, if you have a batch of 100 gastrula stage embryos and eight probes, put approximately 12 embryos into each of eight tubes. Using 12–16 embryos per probe is recommended.
-
-
12. Preheat prehybridization buffer to 65°C in a hybridization oven.
-
13. Replace the 0.05% PBTween with 700 µL of preheated prehybridization buffer. Incubate on a microsample incubator for ∼2 h at 65°C.
-
14. In separate tubes, add 10 µL of 20× anti-sense digoxigenin-labeled RNA probe (20 ng/µL) to 190 µL of hybridization buffer and denature for 5 min at 80°C on a microsample incubator.
-
15. Replace prehybridization buffer in the tube containing embryos with hybridization buffer containing the denatured probe and incubate overnight at 65°C on a microsample incubator.
Day 2: Posthybridization Washes and Primary Antibody Incubation
-
16. Preheat hybridization buffer and 2× SSCT buffer to 65°C in a hybridization oven.
-
17. Carefully remove as much probe as possible from the embryos using a p200 pipette tip.
-
Probes can be reused four times and stored for up to a year at −20°C.
-
Perform the following washes (Steps 18–22) using 700 µL of each solution at 65°C on a microsample incubator. Mix enough of each wash solution for the number of samples processed.
-
-
18. Rinse the embryos with hybridization buffer.
-
19. Wash with a 2:1 ratio of hybridization buffer to 2× SSCT for 15 min.
-
20. Wash with a 1:2 ratio of hybridization buffer to 2× SSCT for 15 min.
-
21. Wash with 2× SSCT for 15 min.
-
22. Wash with 0.2× SSCT twice for 30 min each time.
-
23. Wash embryos twice with 500 µL TNT for 5 min each time at room temperature.
-
24. Incubate embryos with 500 µL TNTB (1% blocking reagent) for a minimum of 1 h at room temperature.
-
25. Prepare enough anti-digoxigenin-POD at 1/500 in TNTB for all samples.
-
26. Carefully remove most of the TNTB using a p200 pipette tip and replace with 500 µL anti-digoxigenin-POD primary antibody mix. Place on a gently rocking platform overnight at 4°C. Do not agitate the sample by inverting the tube.
Day 3: TSA Reaction and Imaging
-
Perform the following reaction and staining at room temperature.
-
27. Remove the primary antibody mix. Rinse embryos with 700 µL of TNT.
-
28. Wash embryos six times in 700 µL of TNT for 20 min each time.
-
29. Dilute sufficient Cy3 TSA 1/25 in 1× amplification diluent for 100 µL per sample.
-
30. Carefully remove all of the TNT. Use a p200 pipette tip to remove any residual TNT.
-
31. Add 100 µL of diluted Cy3 TSA to embryos and incubate for 30 min.
-
32. Stop the reaction by adding 1 mL of TNT. Remove the solution.
-
33. Wash embryos with 1 mL of TNT for 20 min.
-
34. Counterstain with 500 µL of 1/500 DAPI in PBTween for 1 h.
-
35. Rinse with 700 µL of PBTween.
-
36. Wash three times with 700 µL of PBTween for 20 min each time.
Mounting Embryos for Imaging
-
37. Make microcentrifuge tube aliquots of 1.2% (w/v) low melting temperature agarose in water according to the manufacturer's instructions. Store at −4°C indefinitely.
-
38. Heat aliquots of 1.2% low melting temperature agarose at 70°C on a microsample incubator until molten then move to a 42°C incubator to keep warm.
-
39. Transfer a single embryo to an aliquot of premelted 1.2% low melting temperature agarose using a glass Pasteur pipette, being careful to minimize the transfer of PBTween.
-
40. Let the embryo briefly mix with the molten agarose, then quickly transfer the embryo using a glass pipette in a droplet (∼50 µL) to a dish suitable for imaging on either an inverted or upright confocal microscope.
-
The DAPI counterstain can be used to orientate samples if you have access to a fluorescence stereoscope.
-
-
41. Repeat Steps 39 and 40 until each embryo is arranged in individual droplets in a grid like pattern in the center the imaging dish.
-
42. After the agarose droplets have hardened, fill out the rest of the dish with 1.2% low melting temperature agarose until the bottom is completely coated but the embryos are only barely submerged.
-
43. After 15 min, fill the dish with 1× PBS to prevent the samples from drying out.
-
For best results, image the embryos as soon as possible (Fig. 1); however, the mounted embryos can be stored for a few days at 4°C.
-
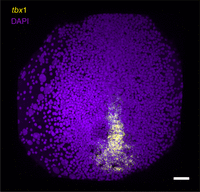
Nothobranchius furzeri embryo probed for tbx1 mRNA at 4 d postfertilization. Scale bar, 50 µm.
TROUBLESHOOTING
Problem (Step 3): Tissue damage occurs when the chorion is removed.
Solution: Removing the chorion is a delicate process that takes patience. It is akin to removing the eggshell from a hardboiled egg. The chorion should be removed in pieces instead of all at once to avoid tearing the embryo. The best place to make the initial hole with your forceps is near the oil droplet because this is usually on the opposite side of the embryo proper. The oil droplet may react with the TSA solution, so it is best to remove it completely.
ACKNOWLEDGMENTS
This protocol is an amalgamation of the in situ protocols passed down by Dr. Alberto Stolfi and former members of the Alexander F. Schier Laboratory.
Footnotes
-
From the African Turquoise Killifish collection, edited by Anne Brunet.


