
Simple Copy Number Determination with Reference Query Pyrosequencing (RQPS)
- 1 Department of Developmental Biology, School of Medicine, Washington University, St. Louis, Missouri 63110, USA
- 2 Division of Dermatology, Department of Medicine, School of Medicine, Washington University, St. Louis, Missouri 63110, USA
- ↵ 3Corresponding authors (liuzhenyi{at}wustl.edu; kopan{at}wustl.edu).
INTRODUCTION
The accurate measurement of the copy number (CN) for an allele is often desired. We have developed a simple pyrosequencing-based method, reference query pyrosequencing (RQPS), to determine the CN of any allele in any genome by taking advantage of the fact that pyrosequencing can accurately measure the molar ratio of DNA fragments in a mixture that differ by a single nucleotide. The method involves the preparation of an RQPS probe, which contains two linked DNA fragments that match a reference allele with a known CN and a query allele with an unknown CN. In each fragment, a single nucleotide variation (SNV) is engineered to differentiate it from its genomic counterparts when the probe is mixed with genomic DNA. The ratios of the two pairs of fragments (probe reference vs. genomic reference and probe query vs. genomic query) in the mixture reflect the ratio between the probe and the genomic DNA in a CN-dependent manner. Pyrosequencing can be used to quantify these ratios and thus determine the CN of the query allele. This method could be used to measure the CN of any transgene, differentiate homozygotes from heterozygotes, detect the copy number variation (CNV) of endogenous genes, and screen embryonic stem (ES) cells targeted with bacterial artificial chromosome (BAC) vectors that are not compatible with standard screening methods.
RELATED INFORMATION
The principle of RQPS is described in Figure 1 and in Liu et al. (2009). In addition, readers not familiar with pyrosequencing technology are encouraged to visit www.pyrosequencing.com/DynPage.aspx?id=7454.
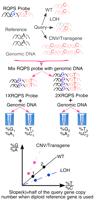
Principle of RQPS. The RQPS probe consists of two physically linked DNA fragments. One matches a reference allele with known CNs in a genome (black) and the other the query allele (pink). Each has a SNV to differentiate it from its counterparts in the genome (G vs. A for the reference and T vs. C for the query in this example). When different amounts of probe and genomic DNA are mixed, their molar ratio can be determined by quantitative pyrosequencing of either the reference (%G/%A) or the query (%T/%C) SNV. The value of this ratio will be equal (%G/%A=%T/%C) if the CN of the query allele equals that of the reference allele. Otherwise, they will be unequal. Specifically, when %G/%A is plotted against %T/%C, a line through the origin (0, 0) is expected, and the CN of the query gene equals the product of the slope of this line and the CN of the query gene. (Reprinted from Liu et al. 2009.)
MATERIALS
Reagents
dATP (2 mM) (optional; see Step 12)
Denaturation solution (0.2 N NaOH)
Ethanol (70%)
Gel extraction kit (e.g., QIAquick Gel Extraction Kit; QIAGEN)
PCR (polymerase chain reaction) purification kit (e.g., QIAquick PCR Purification Kit; QIAGEN)
Plasmid purification kit (e.g., Miniprep Kit; QIAGEN)
Primers
-
Cloning primers (see Step 5)
-
PCR amplification primers (see Steps 1-4)
-
Sequencing primers (see Steps 1-4)
Custom-designed primers are available commercially from companies that offer oligo synthesis service, e.g., IDT, Invitrogen, and Sigma-Genosys.
PyroMark Gold Q96 Reagents (QIAGEN)
Restriction enzyme (see Step 16)
Streptavidin Sepharose High Performance beads (GE Healthcare)
Stuffer DNA plasmid template (see Step 5)
TA cloning vector system (e.g., pGEM-T Easy Vector System; Promega)
Taq DNA polymerase and dNTPs (e.g., Bullseye Taq DNA Polymerase 2.0X Master Mix [Midsci BE140303], or equivalent)
If high-fidelity Taq DNA polymerase is used (e.g., Pfx50 DNA polymerase; Invitrogen), carry out Step 12.
Regular Taq DNA polymerase and Taq DNA polymerase reaction buffer with MgCl2 (10X) are needed for Step 12.
Tissue or cells of interest
Universal biotinylated primer (UBP): 5′-[Biotin]-GCTGCTCCGGTTCATAGATT-3′
This primer can be ordered from companies that offer oligo synthesis service, e.g., IDT, Invitrogen, and Sigma-Genosys. Note that the UBP sequence given here is compatible with the common tail sequence used in this protocol, and it will bind to the amplicons produced by the gene-specific tailed and untailed primers. If a different common tail is used, the sequence of the UBP must be changed accordingly.
Washing buffer (10 mM Tris-acetate, pH 7.6)
Equipment
DNA gel electrophoresis equipment
Internet access to single nucleotide polymorphism (SNP) databases and BLAST (see Step 2)
Microcentrifuge
Micropipettes and barrier tips
PCR tubes or 96-well PCR plate (see Step 30.ii note)
PyroMark Q96 Plate (QIAGEN)
PyroMark Q96 Vacuum Workstation (QIAGEN)
Pyrosequencing Assay Design Software (QIAGEN)
Pyrosequencing instruments (e.g., PSQ 96MA, PyroMark Q96 ID, or PyroMark Q96 MD; QIAGEN)
Shaking platform
Thermocycler
Tubes (microcentrifuge)
Ultraviolet (UV) spectrophotometer (e.g., Nanodrop 2000; Thermo Scientific)
Vortex mixer
Water baths preset to 55ºC (shaking for Step 18) and 70ºC
METHOD
Design the RQPS Primers (1-2 h)
The RQPS probe is linear DNA consisting of two physically linked DNA sequences, one of which corresponds to part of the query gene and the other to the reference gene, each with a SNV to differentiate the probe from the corresponding part of the genome (see Fig. 2 ).
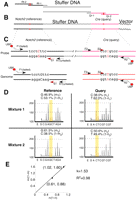
An example showing how RQPS is employed to determine the copy number of a Cre transgene with Notch2 as reference. (A) The RQPS probe is made by sequentially amplifying a stuffer DNA fragment with two pairs of ~70-bp oligonucleotides. The two primers on the left (Rf-1 and Rf-2) will add a fragment corresponding to part of the mouse Notch2 gene onto the stuffer DNA, while the two primers on the right (Qr-1 and Qr-2) will add a fragment of the Cre gene. (B) The two SNVs (C for the Notch2 probe and C for the Cre probe, red and capitalized) are incorporated into the oligonucleotides at the time of their synthesis. (C) The reference and query fragments containing the SNVs are amplified with a three-primer PCR, and the biotinylated strand will be purified with streptavidin beads, followed by sequencing with sequencing primers. Pyrograms from a representative experiment are shown in (D). In this specific example, G stands for the reference probe and C for the reference genome, because the sequencing primers sequence the minus strand. For the query pyrograms, the C peak also includes the contribution from the C just in front of the SNV. (E) A plot of G/C against C/T produces a line with a slope of 1.53. Because there are two copies of Notch2 in the mouse genome, the copy number of Cre transgene in this animal is three.
-
1. Select a gene/genomic locus with a known CN in the genome as the reference gene.
Although any gene/genomic locus can be used as a reference, it is best to use genes unlikely to have CNV or SNPs among individuals, such as the exons of the genes that will give phenotypes in case of amplification or loss of heterozygosity. We routinely use mouse and human Notch2 as reference genes in our studies. SRY is another (haploid) possibility in males.
-
2. Select a PCR-friendly DNA sequence (50-100 bp) from the reference gene/locus and change a single nucleotide to introduce a SNV around the center (see Fig. 2).
-
i. To avoid the interference of naturally occurring SNPs and DNA variations, select coding DNA sequence and avoid the third codon position.
-
ii. Consult a SNP database to confirm the sequence if such a database is available.
The SNP information among different mouse strains can be found in the mouse Phenome database at Jax ( http://phenome.jax.org). Links to various other SNP databases can be found at the website for the Center for Human and Clinical Genetics, Leiden University Medical Center (http://www.humgen.nl/SNP_databases.html).
-
iii. Perform a BLAST search with the Basic Local Alignment Search Tool (BLAST) (http://blast.ncbi.nlm.nih.gov/Blast.cgi) to help ensure that the selected sequences are unique in the genome under study.
-
-
3. Design PCR amplification and sequencing primers for the reference sequence (see Fig. 2) with Pyrosequencing Assay Design Software.
-
i. Design three primers: two PCR amplification primers (F1 and R1) and one sequencing primer (S1).
-
ii. Choose primers with a high score (>85) in the Assay Design Software.
-
iii. Add a common tail (5′-AGCGCTGCTCCGGTTCATAGATT-3′) to the 5′ end of the PCR amplification primer that is in the opposite direction of the sequencing primer (F1 in Fig. 2).
Do not add this tail to the primer that goes the same direction as the sequencing primer. The former is called a tailed primer, and the latter untailed. This tail allows binding of the UBP for streptavidin-mediated single-strand purification of the DNA template (see Steps 32-40).
-
-
4. Repeat Steps 2 and 3 for the query gene (to prepare F2, R2, S2).
The SNP and primer design for the reference and query genes are independent from each other, because the pyrosequencing reactions will be performed in different wells.
Prepare the RQPS Probe (1-2 wk)
-
5. Select a stuffer fragment that is ~200-500 bp in length and design two DNA primers (Rf-1 and Qr-1):
-
i. The stuffer DNA fragment can be any DNA that has no significant homology to either the query or reference sequence.
-
ii. Each primer should be ~70 bp long, with 20 bp on the 3′ end complementary to the stuffer DNA sequence and 50 bp on the 5′ end matching the reference (for Rf-1) and query (for Qr-1) DNA fragments (see Fig. 2A).
-
iii. Incorporate the SNVs chosen in Step 2 into these primers.
-
-
6. Use the primers designed in Step 5 to prepare the following amplification mix:
2X Bullseye Taq DNA Polymerase Master Mix 25 μL 20 μM primer 1 (Rf-1) 2.5 μL 20 μM primer 2 (Qr-1) 2.5 μL Stuffer DNA template 1 ng H2O to 50 μL -
7. Perform the following PCR cycling program:
No. of cycles Temperature Time 1 95°C 2 min 35 95°C 15 sec 60°C-68°C 30 sec 68°C 30 sec 1 4°C Hold To conserve energy, the samples can also be held at 10ºC overnight (instead of 4ºC).
-
8. Analyze an aliquot of the completed reaction by DNA gel electrophoresis to confirm that the PCR worked.
-
9. (Optional) If the designed reference and query fragments are >50 bp, design another pair of primers (Rf-2 and Qr-2 in Fig. 2) with 3′ ends that overlap Rf-1 and Qr-1, respectively. Repeat the PCR, using 1 μL of product from the reaction in Step 7 as template.
The RQPS probe can be prepared with other DNA cloning methods or direct DNA synthesis, but the strategy described here (sequential PCR) is simple and economical.
-
10. (Optional) Analyze an aliquot of the completed reaction by DNA gel electrophoresis to confirm that the PCR worked.
-
11. Purify the final PCR product with a PCR purification kit (e.g., QIAquick PCR Purification Kit) according to the manufacturer’s instructions.
If nonspecific bands appear in the gel, then the desired band should be cut from the gel and purified with a gel extraction kit.
-
12. (Optional) If high-fidelity Taq DNA polymerase (e.g., Pfx50 DNA polymerase) was used in the PCR, perform an A-tailing procedure with the purified PCR product to prepare it for TA cloning.
-
i. Mix the following components:
Purified PCR product 7 μL 2 mM dATP 1 μL Taq DNA polymerase (regular) 1 μL 10X Taq DNA polymerase reaction buffer (with MgCl2) 1 μL -
ii. Incubate the mixture for 15-30 min at 70°C.
High-fidelity Taq DNA polymerase will not produce a 3′ overhang A in the PCR product.
-
-
13. Clone the purified PCR product into a TA vector according to the manufacturer’s instructions.
-
14. Screen for positive clones.
-
15. Purify and sequence the plasmid to confirm that the sequence is correct.
-
16. Linearize ~5 μg of plasmid with a restriction enzyme that will not cut inside either the query or reference DNA fragment.
-
17. Gel-purify the linearized plasmid with a gel extraction kit.
This purified, linearized plasmid will be used as the RQPS probe.
Purified RQPS probes can be stored at −20°C until use.
Prepare the Genomic DNA (~5 min hands-on time per sample)
Various protocols or commercial kits can be used to purify genomic DNA from tissues and cells. We routinely use the following method described by Laird et al. (1991).
-
18. Digest the tissues or cells in 500 μL of tissue lysis buffer for 2 h or overnight with agitation at 55°C.
500 μL of tissue lysis buffer should be sufficient to fully digest a 2- to 3-cm-long mouse tail. Bigger tissues may need more tissue lysis buffer; adjust the volume accordingly. If digestion is incomplete after an overnight incubation, add more proteinase K and agitate for ~2 h until the tissue is fully digested.
-
19. Centrifuge the digests to pellet the tissue debris. Transfer the supernatant to a new microcentrifuge tube.
-
20. Add an equal volume of 100% isopropanol and mix well to precipitate genomic DNA.
-
21. Centrifuge the tubes at 13,000g for 2 min in a microcentrifuge to pellet the genomic DNA.
-
22. Discard the supernatant and add 750 μL of 70% ethanol.
-
23. Centrifuge the tubes at 13,000g for 1 min and discard the supernatant.
-
24. Centrifuge the tubes briefly to collect the remaining 70% ethanol to the bottom of the tube. Carefully remove the ethanol with a pipette.
-
25. Air-dry the pellet for ~2 min.
Do not over-dry the genomic DNA, or it will be extremely difficult to resuspend.
-
26. Resuspend the genomic DNA:
-
i. Add 200-500 μL of TE buffer for RQPS to the DNA pellet.
-
ii. Vortex.
-
iii. Incubate the DNA/TE mixture for ~2 h at 55ºC.
The amount of TE to use depends on the amount of genomic DNA.
Because the reference and query fragments that will be amplified for pyrosequencing are very short, shearing of genomic DNA by vortexing is not a concern and is probably beneficial.
Purified genomic DNA can be stored short-term at 4°C and long-term at −20°C.
-
Prepare the RQPS Probe/Genomic DNA Mixtures (<5 min per sample)
-
27. Measure the concentration of genomic DNA and RQPS probe with a spectrophotometer.
It is NOT necessary to know the exact concentration of either the genomic DNA or RQPS probe (see Step 28).
-
28. Prepare two mixtures of genomic DNA and RQPS probe for each sample:
-
i. For Mixture I, prepare a 1:1 molar ratio of RQPS probe to genomic DNA.
For a RQPS probe that is 3-4 kb long, 0.3-0.4 pg of probe gives a 1:1 ratio when mixed with 0.3 μg of mouse or human genomic DNA.
-
ii. For Mixture II, prepare a 2:1 molar ratio of RQPS probe to genomic DNA.
-
iii. Bring the final volume of each mixture to 10 μL with H2O.
Theoretically, one mixture should be enough to derive the copy number of the query sequence. However, to assess the quality of data with an R2 value (see Step 52), it is highly recommended to use at least two different mixtures. It is NOT necessary to achieve an exact 1:1 or 2:1 ratio in the mixture, because this ratio will be measured by the pyrosequencing reactions in the following steps.
-
-
29. Thoroughly mix the RQPS probe/genomic DNA by vortexing, and centrifuge briefly to bring all samples to the bottom of the tubes.
Pyrosequencing measures relative ratios, so it is extremely important to mix the RQPS probe and genomic DNA thoroughly!
The mixtures of RQPS probe and genomic DNA can be stored short-term at 4°C or indefinitely at −20°C.
Amplify the DNA Fragments Containing Query and Reference SNVs (~3 h for a 96-well plate)
A pyrosequencing reaction needs to be done on single-stranded DNA template. This can be achieved easily by labeling one strand of PCR product with biotin (Steps 30 and 31), followed by streptavidin-mediated, single-strand purification (Steps 32-40). To reduce the cost, a three-primer PCR system is employed, in which one primer is tailed with a common motif that can be bound by a UBP. (Fig. 2; Fakhrai-Rad et al. 2002).
-
30. For each mixture in Step 29, prepare two different PCRs to amplify DNA fragments that contain either query or reference SNVs:
-
i. Combine the following components for Reaction I (amplifying the fragment containing the reference SNV):
2X Bullseye Taq DNA Polymerase Master Mix 12.5 μL 5 μM untailed reference primer (R1) 1 μL 5 μM tailed reference primer (F1) 0.2 μL 5 μM UBP 0.8 μL H2O 8.5 μL Mixture of RQPS probe and genomic DNA 2 μL -
ii. Combine the following components for Reaction II (amplifying the fragment containing the query SNV):
2X Bullseye Taq DNA Polymerase Master Mix 12.5 μL 5 μM untailed query primer (F2) 1 μL 5 μM tailed query primer (R2) 0.2 μL 5 μM UBP 0.8 μL H2O 8.5 μL Mixture of RQPS probe and genomic DNA 2 μL If two mixtures are made for each sample, four PCRs will be required (two for each mixture). If multiple samples need to be processed, prepare a master mix for each reaction and perform the amplification in a 96-well plate.
-
-
31. Perform the following PCR cycling program:
No. of cycles Temperature Time 1 95°C 15 min 40 95°C 30 sec 60°C 30 sec 72°C 30 sec 1 4°C Hold To conserve energy, the samples can be held at 10ºC overnight (instead of 4ºC).
We have successfully used the same PCR cycle parameters for many different SNVs. Therefore, the optimization of PCR conditions may not be necessary for most SNVs. The PCR product can be stored short-term at 4°C or indefinitely at −20°C.
Purify the Single-Stranded PCR Product with Streptavidin-Coated Sepharose Beads (~15 min for a 96-well plate)
The simplest method to purify the single-strand PCR product from a large number of reactions (in a 96-well plate form) is to use the PyroMark Q96 Vacuum Prep Workstation.
-
32. Fill three troughs of the Vacuum Prep Worktable with 70% ethanol, denaturation solution, and washing buffer, respectively.
-
33. Allow the biotinylated PCR product from Step 31 to bind to streptavidin-coated beads.
-
i. Add the following components to each well with PCR product:
RQPS binding buffer 40 μL H2O 20 μL Streptavidin Sepharose High Performance beads 3 μL -
ii. Mix well.
-
iii. Incubate with constant shaking for 10 min at room temperature.
-
-
34. During the incubation in Step 33, add the following to each well of a PyroMark Q96 Plate: 10 μL of 5 μM sequencing primer (S1 or S2 in Fig. 2) and 40 μL of RQPS annealing buffer.
This is not the 96-well plate from Step 33.
-
35. Continuing from Step 33, turn on the vacuum and use the hand-held Vacuum Prep Tool (VPT) to pick up the Sepharose beads.
-
36. Move the VPT to the trough with 70% ethanol and wash the beads for 5 sec.
-
37. Move the VPT to the trough with denaturation solution for 5 sec.
The PCR product is denatured and the nonbiotinylated strand is removed in this step.
-
38. Move the VPT to the trough with washing buffer for 5 sec.
This step neutralizes the sample.
-
39. Move the VPT to the PyroMark Q96 Plate prepared in Step 34 and shut off the vacuum just before the filter tips touch the surface of the liquid.
It is important to shut off the vacuum JUST before the tips touch the surface of the liquid in the PyroMark Q96 Plate. If it is shut off too early, the beads may be lost or fall to other wells; if it is not shut off when it touches the liquid, some or all of the liquid will be aspirated.
-
40. Gently shake the VPT in the buffer to release the beads.
-
41. Denature the biotinylated, single-stranded DNA by heating the plate in a thermocycler for 2 min at 80°C-90°C.
This step disrupts possible secondary structure in the DNA.
-
42. Cool the samples to room temperature to allow the annealing of sequencing primers to the single-stranded DNA.
Perform the Pyrosequencing Reactions (~15 min for a 96-well plate)
-
43. Set up the plate layout in the Assay Design Software by typing in sample and SNV information.
-
44. Fill the PSQ 96MA cassette with the amount of PyroMark Gold Q96 Reagent recommended by the Assay Design Software.
-
45. Place the PyroMark Q96 Plate into the pyrosequencing machine in the correct orientation and start the pyrosequencing reactions.
Analyze the Data (~10 min per sample)
-
46. Collect readouts from the pyrograms for the following parameters for each sample, and enter the values into an Excel file: m1 (the ratio of the probe reference SNV in Mixture I), m2 (the ratio of the probe reference SNV in Mixture II), n1 (the ratio of the probe query SNV in Mixture I), and n2 (the ratio of the probe query SNV in Mixture II).
Examples of pyrograms and readouts are shown in Figure 2D .
See Troubleshooting.
-
47. Calculate the following parameters (i.e., the ratios of genomic DNA SNVs) for each sample: (1−m1 ), (1−m2 ), (1−n1 ), (1−n2 ).
-
48. Calculate the following parameters for each sample: m1 /(1−m1 ), m2 /(1−m2 ), n1 /(1−n1 ), n2 /(1−n2 ).
-
49. Make an XY scatter plot in Excel with one data point at (n1 /[1−n1 ], m1 /[1−m1 ]) and the second data point at (n2 /[1−n2 ], m2 /[1−m2 ]).
-
50. Add the trend line (linear, y = kx; k is the slope of the line) and set the intercept to zero. Display the linear equation and the R2 value.
-
51. To calculate the CN of the query gene, multiply k by the CN of the reference gene.
For example, if the copy number of the reference gene is two, double the value of k to get the copy number of the query gene.
-
52. Check the value of R2 to assess the quality of the data.
The closer R2 is to 1, the better the data.
See Troubleshooting.
TROUBLESHOOTING
Problem: Pyrosequencing reactions fail or the peaks are too low.
[Step 46]
Solution: This problem most likely reflects the failure of the PCRs performed in Step 31. Try to use more RQPS probe/genomic DNA mixture or redesign the RQPS probe to a different region.
Problem: The value of R2 is bad (very small or even negative).
[Step 52]
Solution: Consider the following:
-
1. Repeat the experiment.
-
2. Make more than two RQPS probe/genomic DNA mixtures (see Step 28).
-
3. Make sure the RQPS probe and genomic DNA are well mixed (see Step 29).
-
4. Redesign the RQPS probe.
DISCUSSION
Here, we present a protocol for using RQPS to measure the CN of a gene in a genome. The RQPS method is simple, rapid, inexpensive, sensitive, and high-throughput-friendly. Once an RQPS probe is made for a specific locus, a large number of samples can be processed efficiently in a short time. When compared with real-time quantitative PCR, RQPS has multiple advantages. While a successful real-time PCR often involves careful optimization to achieve 100% PCR efficiency, such optimization is not required for RQPS. We have routinely used the same PCR amplification conditions with primers recommended by the Assay Design Software without failure. Because the RQPS probe and the genomic DNA are amplified in the same tube and pyrosequencing measures relative ratios, PCR efficiency and pipetting error have no effect on the accuracy of the results. This also makes it unnecessary to prepare duplicate or triplicate reactions.
The fact that RQPS can rapidly measure the CN of any locus makes it an attractive choice for many applications. For example, in basic research, it can be used to differentiate homozygotes from heterozygotes. We have routinely used this technique to screen for homozygotes of different Cre transgenic lines in our mouse colony with a Notch2-Cre RQPS probe (which is available upon request) (Liu et al. 2009). Moreover, we have demonstrated previously that, by measuring the loss of one copy of the targeted allele, RQPS can be used for the screening of targeted ES cells (Liu et al. 2009). Such a screening method is particularly useful for ES cells that are targeted with vectors bearing extremely long homology arms (>10 kb), such as whole BAC targeting vectors, because the long homology arms often make it impossible to use Southern blot or traditional PCR to characterize the homologous recombinants (Testa et al. 2003; Valenzuela et al. 2003; Yang and Seed 2003). Most importantly, the power of such a screening method is further enhanced when it is combined with the simple pyroscreening enrichment protocol, another pyrosequencing-based innovation we have developed (Liu et al. 2009). These advantages make RQPS a rapid and simple alternative to the traditional ES cell screening methods. Finally, RQPS may be used clinically to screen for the gain or loss of specific genes or DNA loci in patients (Liu et al. 2009).
ACKNOWLEDGMENTS
We thank Mary Fulbright for critically reading the manuscript. This research was supported by RO1 DK066408 to R.K. and GM068598, CA84271, and AG024561 to K.K. K.K. is a Senior Scholar of the Ellison Medical Foundation. R.K., Z.L., and Washington University filed a patent application No. 61/110,073 describing this technology.


