
Live Cell Imaging in Fission Yeast
- ↵1Correspondence: D.P.Mulvihill{at}kent.ac.uk
Abstract
Live cell imaging complements the array of biochemical and molecular genetic approaches to provide a comprehensive insight into functional dependencies and molecular interactions in fission yeast. Fluorescent proteins and vital dyes reveal dynamic changes in the spatial distribution of organelles and the proteome and how each alters in response to changes in environmental and genetic composition. This introduction discusses key issues and basic image analysis for live cell imaging of fission yeast.
INTRODUCTION
The size and shape of the fission yeast lends itself to elegant microscopy-based analysis. From the late 1950s Murdoch Mitchison and Carl Robinow developed techniques to image organelle dynamics in living yeast by suspending cells in media containing gelatin to raise the refractive index of the mounting medium to match that of the cytoplasm (Mitchison 1957, 1970; Robinow and Marak 1966). Later studies substituted polyvinylpyrrolidone for gelatin (Hagan et al. 1990). However, these approaches have long been surpassed by the exploitation of powerful fission yeast genetics to image fusions between a protein of interest and fluorescent proteins (FP). Virtually all state-of-the-art imaging techniques have been used to study fission yeast: standard and inverse fluorescence recovery after photobleaching (FRAP and iFRAP, respectively) (Busch et al. 2004; Hachet et al. 2011), Förster resonance energy transfer (FRET) (Flory et al. 2004), fluorescence-lifetime imaging microscopy (FLIM) (Hachet et al. 2011), bimolecular fluorescence complementation (BiFC) (Hachet et al. 2011; Grallert et al. 2013a), laser ablation (Khodjakov et al. 2004), and quantification (Wu and Pollard 2005) and super-resolution (Lando et al. 2012; Dodgson et al. 2013) microscopies.
CHOOSING A FLUORESCENT MARKER
Fluorescent Dyes
Fluorescence live cell imaging in fission yeast began with the application of 4′,6-diamidino-2-phenylindole (DAPI) to capture snapshots of the detailed morphology of nuclei in cell cycle mutants (Toda et al. 1981). Subsequently, a range of vital dyes has been used to visualize organelles, membranes, and ion concentrations in living cells: Hoechst (Chikashige et al. 1994), DASPMI (Yaffe et al. 1996), MitoTracker (Chu et al. 2007), FM4-64 (Bone et al. 1998), filipin (Takeda and Chang 2005), and Fura-2 (Zhang et al. 1997). Although many have a negligible impact on cell physiology when used properly, care should be taken to ensure that the correct concentration is used and that the incubation period is appropriate to minimize the impact on cell function. For example, illumination-mediated excitation of DNA-binding molecules can damage DNA and thus impact on nuclear organization. For this reason DAPI has been surpassed by Hoechst 33258 for live cell imaging (see Protocol: Microscopic Observation of Living Cells Stained with Fluorescent Probes [Asakawa et al. 2016]).
Fluorescent Proteins
cDNAs encoding FP tags can easily be fused to the 3′ terminus of a gene at its genomic locus in less than a week via polymerase chain reaction techniques (Wach et al. 1997; Bähler et al. 1998; Janke et al. 2004), whereas recombinase-mediated cassette exchange (RMCE) and marker switch approaches that take marginally longer support tagging at the amino terminus (MacIver et al. 2003; Watson et al. 2008; Tang et al. 2011). The aim is to support stable expression at wild-type levels, because the single integrated FP-tagged allele remains under the control of the endogenous promoter at the endogenous chromosomal location. However, it is important to remember that even if the fusion has no impact on protein function, introduction of foreign sequences into the genome can alter noncoding RNA or heterochromatin functions at and around the target locus. Full details of the methods for genomic manipulation are provided in Introduction: Molecular Genetic Tools and Techniques of Fission Yeast (Murray et al. 2016).
The introduction of any external factor to a cell can impact normal physiology. Careful consideration must therefore be given to the choice of fluorescent markers and design of fusions to minimize the impact on protein function. Functional domains in the candidate protein can suggest a preferred terminus for tagging (e.g., if the activating/interacting domain is at the amino terminus, attempt tagging at the carboxyl terminus). Often the inclusion of glycine- and alanine-rich linker sequences between the protein and the FP can overcome negative influences on function. However, there are no definitive rules that can predict which mode of tagging will be optimal for a particular target/FP combination, making it essential to test functionality of amino- and carboxyl-tagged versions of a protein of interest using an appropriate assay. If antibodies are available, immunofluorescence staining (see Protocol: Immunofluorescence Microscopy of Schizosaccharomyces pombe Using Chemical Fixation [Hagan 2016]) of both wild-type and the FP-fusion expression strains to determine whether the distribution of the target protein is affected by fusion to the FP is an excellent assay of functionality. Alternatively, use imaging, biochemistry, and genetics to assess the impact the fusion has on the process in which it participates. For example, synthetic lethality or suppression of conditional mutations in a functionally related molecule is often a simple yet sensitive means of revealing subtle impacts on function.
A large range of FPs with specific excitation and emission wavelengths, folding times, and quantum yields (i.e., the number of fluorescence events triggered by the excitation photon) have now been characterized. The founding green fluorescent protein (GFP) remains the best-characterized and most photostable FP (i.e., it is less susceptible to damage from the excitation light source). For studying true protein dynamics, single molecule analysis, and quantitation of molecule composition at defined locations (Wu and Pollard 2005) it is vital that the FP is monomeric. There are benefits and drawbacks for each FP. For example, although blue/cyan wavelength FPs provide the best spatial resolution (resolution is a function of wavelength), they are not as bright as GFP variants and the shorter wavelengths used to excite the cyan FPs are more toxic than longer wavelengths. In contrast, although imaging red fluorescent proteins (RFPs) is least toxic and their emission spectra allow excellent wavelength detection separation from GFP (e.g., mCherry is an excellent partner for GFP in colocalization and FLIM experiments), they are generally less bright, less stable, and bleach more rapidly than GFP, especially at higher culture temperatures (e.g., 36°C) (Fig. 1A). Each FP also has a characteristic maturation period (i.e., the time it takes for the newly synthesized FP polypeptide to fold into its mature fluorescent conformation). Although rapid maturation is beneficial for most applications (the dLanYFP derivative mNeonGreen requires <1 min whereas GFP requires ~25 min; Shaner et al. 2013), slow-folding RFPs requiring several hours (Baird et al. 2000) support lineage analysis of organelle inheritance over successive rounds of cell division (Grallert et al. 2004; Lam et al. 2012).
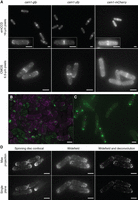
Approaches to imaging. (A) Comparison of fission yeast calmodulin–FP fusion strains and camera chips. Maximum projections from 21 z-plane images of cam1-gfp (left panels), cam1-yfp (center panels), and cam1-mCherry (right panels) cells. Images were captured with either an emCCD (upper panels) or CMOS (lower panels) camera, each using 1× binning. Light intensity, filters, and exposure times are comparable between cameras. Images were captured with 50-msec exposure times for GFP and yellow fluorescent protein (YFP), whereas mCherry images were captured with a 100-msec exposure. (B,C) Two approaches for differentially labeling strains to support direct comparison of phenotypes, localization patterns, and signal intensity under identical imaging conditions in the same field of view. (B) orb2+ and orb2-24 cells, each overexpressing a GFP–Myo1 fusion (green) at 36°C. orb2+ cells were transiently resuspended in TRITC-labeled lectin solution (magenta) before mounting alongside unlabeled wild-type cells. (C) A mixed mounting of tea1-gfp sid4-tdTomato and tea1-gfp tea2Δ cells. tea2+ sid4-tdTomato cells (magenta spindle pole bodies) have strong Tea1–GFP signal (green) at the cell poles whereas the signal intensity is markedly reduced in the tea2Δ cells whose spindle pole bodies are unlabeled. (D) Lifeact-expressing cells imaged on the indicated systems with images captured and processed as indicated. Scale bars: 5 µm.
For low-abundance proteins, brightness can be enhanced by fusing multiple FP tags (e.g., 3×GFP or 2×Tomato tags fused in tandem) (Grallert et al. 2006; Martin and Chang 2006; Martín-García and Mulvihill 2009; Bendezú and Martin 2011), although this signal enhancement comes at the cost of increased mass (e.g., 3×GFP tags increase the mass of an endogenous protein by 81 kDa) and thus could have a greater impact on fusion protein function than a single tag. Such concerns appear to be a particular issue for cytoskeletal studies. A detailed characterization of the impact of different fusion strategies to label the α-tubulin Atb2 highlights the impact of FP labeling strategy and gene promoter usage on microtubule organization and cell viability (Snaith et al. 2010). Actin polymers are exquisitely sensitive to labeling strategies: it has proven impossible to generate functional FP-labeled actin, and even expression of small FP-conjugated actin binding peptides are either lethal or can delay cell division (Karagiannis et al. 2005; Riedl et al. 2008; Huang et al. 2012).
In summary, careful consideration must be given as to the aim of the experiment to select the most appropriate FP for the task. Whichever FP is chosen, internal controls for each experiment are vital to characterize the impact of each particular labeling strategy on the interpretation of results. Although GFP has long been an excellent FP for most imaging applications, its position will be continually challenged making it important to consult members of the fission yeast community involved in imaging (e.g., via Pomblist: http://listserver.ebi.ac.uk/mailman/listinfo/pombelist) to establish which probes are best suited for fission yeast imaging. At the time of writing, the similar absorption and emission spectra and rapid folding yet threefold brighter signal suggest that mNeonGreen will likely be the first to eclipse GFP (Shaner et al. 2013).
CELL PREPARATION, MAINTAINING CELLULAR ENVIRONMENT, AND EXPERIMENTAL DESIGN
Strains must be cultured appropriately and mounted carefully. As in all cell biology analyses, adherence to good strain husbandry is essential (see Introduction: Growth and the Environment of Schizosaccharomyces pombe [Petersen and Russell 2016]). Cells should have been growing in the log phase for a minimum of 2 d before each imaging experiment, and should be maintained in conditions that are as close to a nonstressed environment as possible for the duration of the experiment to avoid stimulating the TOR and MAP kinase pathways that will alter cell physiology (Toone and Jones 2004; Petersen 2009).
Growth Media
Yeast extract-based media autofluoresce at most wavelengths used for live cell imaging, making minimal media more appropriate. Filter sterilization of synthetic minimal media avoids the caramelization that generates background fluorescence, making filter-sterilized Edinburgh Minimal Medium (EMM2) a common choice. Because amino acid supplements increase autofluorescence and can impact protein distribution, imaging prototrophs is highly advisable. The type of nitrogen source dictates the metabolic and signaling pathways engaged within the cell (see Introduction: Growth and the Environment of Schizosaccharomyces pombe [Petersen and Russell 2016]). Such alterations in physiology can be exploited to great benefit when high background is experienced in EMM2. Simply switching to minimal sporulation liquid (MSL) medium (Egel et al. 1994) can abolish this background, presumably because proteins are more rapidly turned over by autophagy in MSL such that superfluous FP–fusion proteins that have yet to be incorporated into structures of interest are removed.
Mounting
The mode of cell mounting is determined by the geometry of the microscope frame (upright or inverted) as well as the duration and the nature of the experiment being undertaken. For upright microscopes the simplest approach is to prepare a pad of agarose media on the center of a slide onto which cells are directly mounted from the culture (i.e., with no centrifugation steps). A coverslip is then placed directly on top of the cells and held in place using wax or tape (Fig. 2A–C). The environment must remain humid because cells can drift out of the plane of imaging if the agarose pad dehydrates. This method is excellent for maintaining cell viability during short-term imaging experiments.
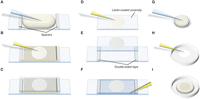
Slide chamber assembly for live cell imaging. Assembly of simple slide-based chambers for live cell imaging for upright (A–C) and inverted (D–F,G–I) microscopes. (A–C) For an upright scope filter-sterilized media containing 2% ultrapure agarose is poured between 2 × 1–2-mm thick spacers that have been fixed 40 mm apart onto a clean microscope slide (A). Once cooled and set, cells are added directly to the surface of the agarose pad (B), which is then covered with a 25 × 50 mm coverslip (C) held in place with wax or tape. (D–F) A simple flow cell. Coverslips are coated with lectin by transiently applying a solution (e.g., 1 mg/mL soybean lectin) before immediately being removed and the coverslip dried (D). The coverslip is inverted and placed carefully onto a slide with appropriately spaced double-sided sticky tape (E). Yeast cells are adhered to the surface of the lectin-coated 25 × 50 mm coverslip and excess cells are washed off with media. The space between coverslip and slide is filled with preconditioned minimal media (F) before the slide is mounted coverslip down onto an inverted microscope. (G–I) Imaging under an agarose pad. A molten solution of 0.5% ultrapure agarose in filter-sterilized medium is poured onto a 2-cm coverslip resting on a smaller diameter coin (G). When the agarose has set, a drop of cells is placed on the oxygen-permeable base of the culture dish and the agarose pad/coverslip is inverted onto the cells. The plate is imaged in a Perspex box containing a damp tissue to maintain a humid atmosphere throughout imaging. After 20 min of settling, cells remain stationary for days, although the flexibility of the membrane demands focusing approximately every 10 min during an imaging period.
An inverted microscope supports more approaches to cell mounting, enabling longer experiments and greater flexibility in experimental design. Cells are generally mounted directly onto the surface of the coverslip of an inverted slide or onto the bottom of a glass-bottomed multiwell plate. A coating of lectin that adheres to the hydrophobic glass surface and carbohydrates in the cell wall is generally used to attach cells to the glass. The affinity of lectins for cell walls can also be exploited to differentially label the cell surface of different strains with different fluorescent lectins (May and Mitchison 1986). One or more strains are labeled with a fluorescent lectin before being mixed with unlabeled cells immediately before imaging. This simple approach supports the ultimate controlled experiment: the simultaneous imaging of two genetically distinct cells in the same field of view, where one culture is labeled with a fluorescent lectin whereas the other is not (Fig. 1B; Beinhauer et al. 1997; Alvarez-Tabarés et al. 2007; Grallert et al. 2007; Attanapola 2009; Martín-García and Mulvihill 2009). Alternatively, an additional fusion protein at a distinct location that emits at a different wavelength can be incorporated into the control strain (Fig. 1C).
A simple flow chamber can also be used to mount cells for short-term (~20 min) observation. In this method, a solution of an appropriate lectin (e.g., 1 mg/mL soybean agglutinin or 2 mg/mL concanavalin A) is applied transiently to a coverslip and the residual solution is air-dried: coverslips remain competent for up to 12 h after coating. Cells from a liquid culture (i.e., without centrifugation) are then adhered onto the coverslip. After unbound cells have been washed away, the cell-coated coverslip is anchored to a clean slide with strips of double-sided tape to generate a chamber that is filled with preconditioned media (Fig. 2D–F).
A number of commercially available chambers support more controlled experiments. The CellASIC ONIX (Hayward, USA) and Cherry Biotech (Rennes, France) microfluidics systems or the Bioptechs FCS2 culture dish chamber system (Butler, USA) all support precise media flow, gas exchange, and temperature control. Because cells are trapped within an elastic flow chamber, microfluidics systems avoid the need to adhere cells onto a chamber surface. This means that progeny remain within the focal plane to support imaging over successive generations (Wood and Nurse 2013). In contrast, because only the first generation of cells will adhere to a lectin-coated surface and daughters float away from the focal plane in this approach, the rapid media exchange around static cells in microfluidic systems makes them ideal for drug exchange during observation. However, if microfluidics are not available, drug exchange can be achieved equally well using a simple Pasteur pipette-mediated exchange of media within a glass-bottomed dish to which cells have been attached using a lectin (Grallert et al. 2013b). A further alternative to microfluidics for long-term imaging over several cell cycles is to trap cells under a thick agarose/medium pad on an oxygen-permeable transparent membrane such as the Lumox culture hydrophilic dish (Fig. 2G–I; Greiner Bio-One, Germany) (Grallert et al. 2004). Although it is technically more challenging to generate custom microfluidic chambers, the ability of such chambers to constrain growth to reshape cells has proven highly informative (Minc et al. 2009; Chang et al. 2014).
Temperature Control
Temperature control is a vital component of any live imaging experiment. Several aids support temperature control, with enclosure of the stage in a box through which preheated air is circulated (e.g., Solent Scientific, Southampton, UK) being the most straightforward. When temperatures above ambient are set, the connection between the objective and the cooler body of the microscope means that the objective acts as a heat sink to locally reduce temperature at the point of observation where temperature control is most critical. Objective heating collars (e.g., Bioptechs) and/or direct heating of the observation chamber (in addition to the Perspex box, e.g., Bioptechs, CellASIC or Cherry Biotech) are excellent solutions. Optimal results are obtained when all approaches (stage, objective, and chamber heating) are applied. Whatever the approach, best results are obtained when the system is set to temperature and allowed to equilibrate to a steady-state overnight before an experiment is undertaken, thus minimizing temperature gradients that can cause a continual and rapid loss of focus resulting from expansion/contractions during observation.
Conversely, the plethora of temperature-sensitive (ts) mutants makes rapid shifts of chamber temperature a highly attractive option for live cell imaging. Such shifts are easily controlled with the heated objective collar/slide system of Bioptechs, or the CellASIC or Cherry Biotech microfluidic systems (Velve-Casquillas et al. 2010; Bouhlel et al. 2015). However, it is important to remember that rapid temperature shifts invoke a stress response that will change cell physiology within 2 min (Toone and Jones 2004), making it essential that appropriate controls are used. A second common pitfall with the use of ts mutants is the assumption that a particular mutation confers an immediate and complete loss of function. All ts mutants were isolated because of their ability to block colony formation on plates, not because there is complete inactivation or degradation of the protein on temperature shift in liquid culture. Consequently, many ts mutants are hypomorphs that retain considerable function and some take more than a generation to completely lose function. Refinement of the instant degradation “degron technology” that works so effectively in budding yeast and mammalian cells (Nishimura et al. 2009; Holland et al. 2012) for use in fission yeast offers great potential for eradicating both the stress of temperature shift and residual function of hypomorphic ts mutations.
However cells are mounted, it is essential to minimize stress during imaging. Heat fluctuations and light damage should both be minimized, and a constant supply of nutrients and oxygen are essential. Imaging stress can lead to a number of effects on protein organization. Certainly microtubule dynamics can change within 30 min of mounting, making it important to stop image capture and remount fresh samples after 20 min. Ultraviolet (UV) stress not only elevates cytoplasmic noise signal, but can also drive changes in protein distribution and cell cycle progression. Therefore, it is important to be consistent for all of your experiments and consider whether the localization pattern was observed immediately, or after the sample had been on the imaging system for a prolonged period.
LIVE CELL IMAGING SYSTEMS
The most fundamental consideration when choosing a live cell imaging system is whether it should be an upright or inverted frame. Inverted microscopes have significant benefits for live cell imaging because cells can be mounted directly onto the coverslip or bottom of the glass chamber/microfluidic system that will sit on the objective. The advantages of this configuration include culture in liquid media that can be exchanged during the experiment, minimization of the distance and refractive index changes between cell and lens, and optional commercial modules to keep the sample in focus throughout the experiment (e.g., the Olympus zero-drift compensation or Nikon Perfect Focus systems)—a useful feature for long-term experiments.
Wide-Field Versus Confocal Microscopy
Wide-field (WF) describes a standard epifluorescence microscope. There are several types of confocal microscopes that can be classified as either point scan or parallel scan systems. Although point scanning systems allow exquisite detail within deeper metazoan samples, the speed of acquisition they support means that the faint signals within yeast bleach before a full image can be captured, and the intensity of the transient illumination required make them phototoxic to fission yeast. Furthermore, the requirement for a separate dedicated detection head and laser for each FP adds unnecessary cost. In contrast, a parallel scanning (e.g., spinning disk) confocal microscope uses a simultaneous multiplex capture system allowing image exposure rates equivalent to a WF system, thus minimizing phototoxicity and supporting the use of electron-multiplying charge-coupled device (emCCD)-based cameras for image detection.
WF and confocal systems differ in one important respect. The entire sample is illuminated in WF, whereas confocal systems illuminate a thin section of the sample, thereby minimizing background fluorescence from out-of-focus light. When using WF microscopy to image the thicker samples usually encountered with metazoan tissue culture this background can be so significant that it effectively reduces the overall resolution of the system. Because S. pombe are only 4 µm wide, the background generated from signals beyond the focal plane is minimal, such that WF microscopy usually gives excellent results. Although they are small, the width of fission yeast exceeds the depth of the focal planes of either WF or confocal systems. It is therefore necessary to capture a consecutive series of images in the vertical z-axis to capture the entire signal within a cell. Because this is an inherent component of the confocal approach, the stage or objective of WF systems must be fitted with piezo motors to support accurate stepwise capture of consecutive slices over a defined distance with a defined period.
Ultimately, there are no hard and fast rules to predict whether a WF or spinning disk system will give best results with a particular fusion protein. In some cases the increase in z-slice clarity supported by spinning disk confocal microscopy captures signals and dynamic movements that are not seen on a WF system equipped with equivalent optics (Fig. 1D; Alvarez-Tabarés et al. 2007; Attanapola 2009). If you are fortunate enough to have access to both types of system (either in-house, or via a visit to a colleague’s laboratory), it is highly advisable to try out both to determine which is best suited to the study of your particular question/protein.
Objective Lenses
The choice of objective will be determined by the FP-fusion signal, the specific assay, and the sensitivity of the imaging platform. It is highly advisable to test a variety of lenses from colleagues or by trialing from the manufacturers before purchase. Detailed analysis of protein organization in yeast generally demands objectives with magnification powers above 60×, although the increased field of view allowed by a 40× lens can be attractive when studying a bright population-wide phenomenon. To capture the faint signals of most FP-fusion proteins in yeast it is critical to use an objective with the highest numerical aperture (NA). NA is an indication of the objective’s ability to gather light and resolve fine detail (i.e., the higher the NA, the more fluorescent signal one can detect). The NA of a particular objective is always embossed on its side alongside the magnification. The highest NA lenses often have a simpler architecture, lacking elements required for phase contrast or differential interference contrast imaging that can reduce the amount of detectable light by up to 50%. Objectives that have been specifically developed for total internal reflection fluorescence (TIRF) applications have the highest NAs (e.g., 1.49 or 1.6, depending on coverslip material). Their short working distance is beneficial for imaging yeast, and the higher their magnification the lower the background from signals outside the focal plane, thus improving the signal-to-noise ratio (Fig. 3).
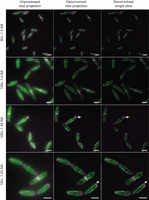
Objective choice and image processing. Images of gfp–atb2 myo52–mCherry cells captured on the same widefield system with the same camera and the indicated lenses (all from the same manufacturer) either with or without deconvolution. Arrows highlight spatial resolution allowed by WF microscopy that allows the researcher to discern that microtubules (green) fit cleanly into gaps between foci of the myosin V (magenta). Scale bars: 5 µm.
Illumination
The options available for illumination are lasers, halogen bulbs, and light-emitting diodes (LEDs). LEDs are rapidly becoming the source of choice because they are bright enough for virtually all live cell imaging applications (often brighter than halogen bulbs), generate no significant heat or UV radiation and, like lasers, emit light of defined wavelengths. Most importantly the intensity of LED emission can be precisely controlled. In contrast, although xenon, tungsten, and halogen systems generate enough light, each has a characteristic spectrum of illumination with some wavelengths being weaker than others, and they all radiate significant amounts of heat and UV radiation. Heating can be minimized with liquid light guides or optical fibers to deliver light, and filters can eliminate UV. Another drawback to these light sources is that the intensity of illumination at the target can only be modulated reproducibly using neutral density filters. Once the frequency and cost of bulb replacement is considered (the lifetime of a halogen bulb is ~300 h, whereas the lifetime of an LED is >10,000 h, and the cost of replacing halogen bulbs is ~100 times that of an LED), an upgrade to LEDs is highly attractive. Although lasers are powerful, tunable, produce light of a precise wavelength, and generate minimal heat to the sample, the cost associated with the demand for different stably mounted lasers for each FP and safety considerations currently make them less attractive for WF systems than LEDs.
Filters
Selecting the right filter combination is as important as the choice of the right objective. When using a white light source, WF systems demand both an excitation filter that excludes wavelengths outside the excitation frequency to deliver a specific wavelength for each specific FP, and an emission filter that allows passage of the light emitted by that FP but excludes the excitation (and often other) wavelengths. Monochromatic LEDs or lasers dispense with the need for excitation filters.
Filters are generated by coating a glass surface with specific minerals to create a precise diffraction grating effect. Magnetron sputter-coated filters are the filters of choice, transmitting light with efficiencies reaching 97%. For simultaneous multi-wavelength experiments, band pass filters are used. Band pass filters support the passage of the strongest portions of a spectrum but exclude the weaker “tails” of the spectra, thus capturing slices of the strongest part of an emission spectrum rather than its entirety. By supporting the capture of consecutive spectral slices, a series of band pass filters supports the capture of signals from multiple FPs in a single sample. However, the need to capture only the strongest part of the spectrum diminishes the amount of light captured because the signal from the “tail” is ignored (see Fig. 2 in Introduction: Fixed Cell Imaging in Schizosaccharomyces pombe [Hagan and Bagley 2016]). Furthermore, each additional coating that is applied to reduce the emission bandwidth diminishes the intensity of the signal transmitted. Consequently, imaging an FP with a filter set that is designed for multi-wavelength imaging will give a considerably fainter signal than a much simpler “long pass” emission filter, which supports the passage of every photon emitted from the FP-fusion to the detector.
Image Detection
Charge-coupled device (CCD), emCCD, and complementary metal oxide semiconductor (CMOS) cameras support rapid exposure times (e.g., <0.5 msec full-chip frame rate for CMOS cameras). The different camera chips use different technologies and each has specific benefits/drawbacks. Although emCCD cameras are extremely sensitive (>90% quantum efficiency) and have been the mainstay of live cell imaging for almost two decades, the much less expensive CMOS detectors are becoming increasingly attractive. Although the individual pixels of CMOS detectors are less efficient than emCCDs, the CMOS detector chip can be much larger than emCCD chips, supporting maximal spatial resolution at lower magnifications than are required for CCD-based chips. Importantly, CMOS detectors have extremely low electric background noise and so generate images with a much better signal-to-noise ratio than emCCD or CCD detectors. This enhanced signal-to-noise ratio goes a long way to compensate for the reduced sensitivity (Fig. 1A). Critically, the larger CMOS detectors support greater levels of “binning.” “Binning” is the process by which the charges from adjacent pixels on the camera chip that are generated when photons collide with the pixel well are combined to give a single composite signal. For example, combining the signal from a 4 × 4 array of 16 pixels will give an overall sensitivity that is 16-fold greater than when sampling each pixel. Thus, binning supports faster readout and improved signal-to-noise ratios at the expense of reduced spatial resolution. However, the loss of spatial resolution is related to the size of the detector. The larger CMOS detectors therefore support far greater levels of binning than emCCD and CCD chips before erosion of image quality. Consequently, faint and/or dynamic signals can be imaged at meaningful frame rates using the larger chips of CMOS cameras. Thus, although emCCD chips remain the system of choice for most low-light applications at the time of writing, rapid developments in CMOS technology are likely to see these advantages eclipsed as major manufacturers abandon CCD technology to concentrate on pushing CMOS technology to greater heights.
Image Acquisition
The optimal acquisition conditions in live cell imaging vary significantly depending on the specific protein and imaging system. There is always a balance between sensitivity, acquisition rate, and experiment duration. High-intensity excitation light induces photochemical oxidation to irreversibly photobleach the FP. Thus, although high-intensity excitation light generates excellent signals, the number of images that can be acquired is limited. Reducing the excitation intensity by half and doubling the exposure time has a disproportionately positive impact on the number of possible frames than can be captured.
Understanding acquisition software can help to improve image acquisition rates and reduce background noise. Storing images directly to the data drive on capture can add an additional 100 msec to the acquisition rates. “Streaming” enables thousands of images to be stored instantly on the camera or computer RAM chips for the duration of the experiment before the data is subsequently written to the long-term storage disc. Alternatively, an average image can be calculated by combining the input from a number (typically three) of stream capture images, considerably reducing nonspecific background noise. Finally, rather than using the entire surface area of the detector to capture an image, it is possible to define a much smaller “region of interest” to reduce the amount of time required to capture and download an image.
IMAGE ANALYSIS
A number of commercial and open source options support image processing, analysis, and visualization. A variety of information can be extracted from the image data: duration, volume, signal intensity, and in some cases, tracking of dynamic molecules. Each package will concentrate on the application of particular algorithms. Two widely used approaches merit a brief mention here.
Maximum Projection
Maximum projections are a composite image from consecutive focal planes in the z-axis of a sample. The volume of pixels with maximum intensity from each consecutive focal plane is combined to generate a single image. This technique is computationally fast, but the two-dimensional output does not provide a good sense of depth of the original data. It is important to remember that some or all of the background fluorescence of each individual slice will be captured. This accumulation of background signal significantly erodes the signal-to-noise ratio of the final composite such that signals that were clearly differentiated in an individual slice can become lost in the increasing background “fog” of a maximum projection. Thus, although the use of maximum projection software has become the routine end to most image capture, it is important to remember that returning to individual slices can give better resolution and more information for punctate structures that reside in one plane alone (Fig. 3).
Image Deconvolution
Deconvolution is a computational method for removing background generated from signals beyond the focal plane (Van der Voort and Strasters 1995). This is computationally slow and requires calibration of the imaging platform to calculate the degree to which the signal from a point is distorted by the optics of the system. Computation is then used to reassign the distorted signal back to a theoretical set of points from which it is assumed the distorted signal emanated. The result can be a considerable enhancement of resolution and removal of background fluorescence. When applied to images of consecutive focal planes, considerable improvement over standard maximum projection can be achieved (Figs. 1D, 3). It is critical to undertake any analysis of the image data before deconvolution because the process not only normalizes intensities to maximize the dynamic range, but also can remove faint but significant signals.
CONCLUSION
One final word of warning when assessing analyzed data: do not become focused on differences observed in absolute figures obtained from live cell imaging experiments from different laboratories. These will differ from laboratory to laboratory and can be affected by the precise genetic makeup of strain and the way in which the cells were cultured, mounted, and observed under the microscope, as well as by the detailed configuration of the imaging system. The most important points are to ensure consistency of imaging conditions in one’s own experiments, that all appropriate controls are applied, and that cell stress and phototoxicity have been minimized.
A number of resources provide more detail about the concepts and methodologies underlying and physics of imaging and the technologies discussed here, including optical physics textbooks (Smith 2007), dedicated microscopy manuals (Goldman et al. 2010), and online resources (e.g., http://www.microscopyu.com). For more detail on filter selection, see manufacturers’ websites (e.g., http://www.chroma.com or http://www.semrock.com).
ACKNOWLEDGMENTS
The author would like to thank K. Baker for micrographs used in the figures of this introduction. The author is a Royal Society Industry Fellowship and research in his laboratory is supported by funding from the Biotechnology and Biological Sciences Research Council.
Footnotes
-
From the Fission Yeast collection, edited by Iain M. Hagan, Antony M. Carr, Agnes Grallert, and Paul Nurse.


